There are two ways to acheive this.
1) Image swapping, using the Choice Integer to select the appropriate image.
2) Using Frames in an image, Animation Position selects the correct image frame.
Image file switching.
The first way is to create a series of screenshots from the ‘scope making sure to get the size and framing accurate to prevent “jumping” or “jitter” when swapping the images. The images are then switched as each oscillator waveform is selected.
This method requires some third party modules by Eleana Novaretti;
ED GUI Fixed String,
ED Switch > String.
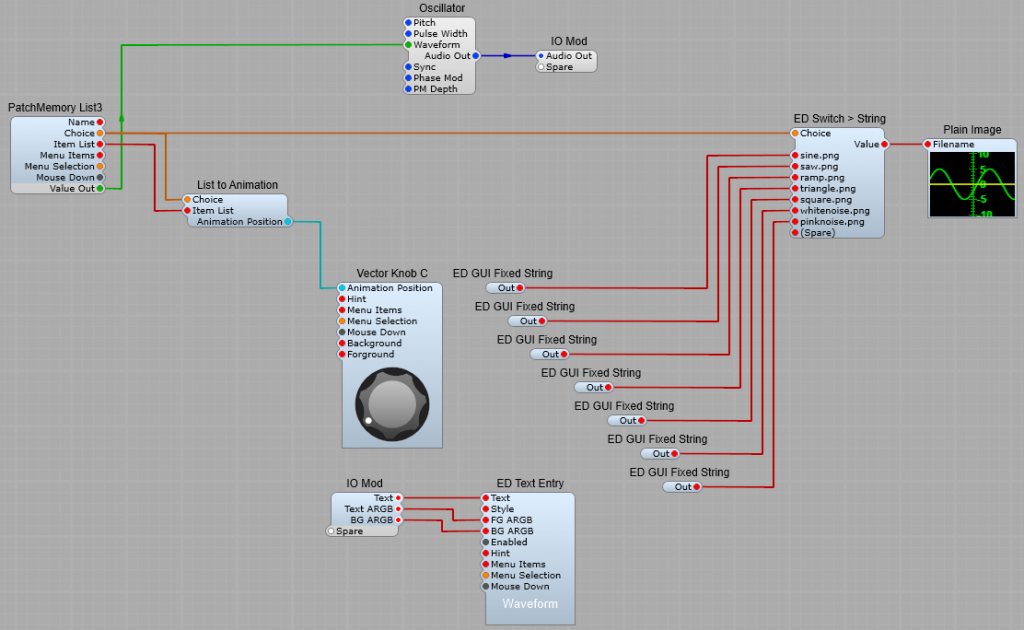
How the image switching works.
The list of options is taken from the Oscillator module, and converted to an enumerated list composed of ; Choice, a list of Integers from 0 to 6 (the list of options always starts at 0) and Item List, the list of options in text form (each item separated by a comma). List to animation converts the List to Animation position, which is used to select Items from the list. The Integer part of the list is sent to the ED Switch > String, this takes the value from the approproiate ED GUI Fixed String and sends it to the Plain Image module, so as we rotate the knob and select the desired Oscillator waveform, the matching image is displayed.
To create your Images you’ll need some sort of picture editing software to crop them to a uniform shape and size using the ctrl+Print Screen combination, then pasting the screenshot into the photo editor to crop the images and save them.
Swapping images using Frames.
This works by having a single large image in a long vertical strip composed of all the required images, which is interpreted by SynthEdit as “Frames”.
A text file is created along with this image file and stored with the file in the default skins folder. So if you name your image file waveforms.png, then you would need to name the textfile as waveforms.txt.
An example of waveforms.txt could be;type animated
frame_size 120 , 100
mouse_response rotary
The line frame_size 120 , 100 is the telling Synthedit the dimensions in pixels each frame of the image file, so here each frame needs to be 120 px wide, and 100 px high. Width is specified first, then height. This needs to be correct to keep the animation of the frames smooth.
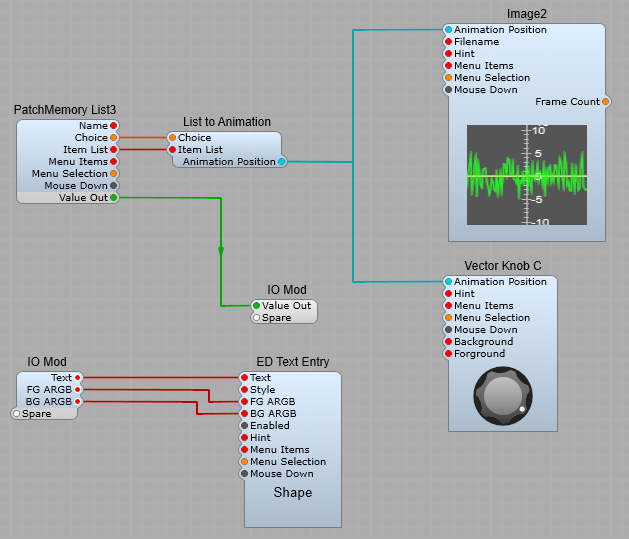
The list is taken from the VCO module and converted by the PatchMemory list into an enumerated list, then fed to the List to Animation module which sends the Choice value (as usual starting at 0) to the Vector Knob C (You could use a knob mage with an Image2 module-it’s your choice), and the Image 2 module. The Image2 module interprets the Animation position as a Frame number, and selects the correct section of the large image to display (this is why your image measurements must be correct, and consistent).
Note: because the Animation Position data is bi-directional, if the Mouse Response for the Image2 module that displays the images is set to Horizontal or Vertical the mouse can also be used to select the waveform by clicking on the waveform display and dragging in the appropriate direction.
Which method is best?
Frames:
Using frames gives the simplest structure to work with, but relies on making up a large composite image using identically sized smaller images. With this method the waveform display can also be used to select the Oscillator waveform.
Individual images:
Using individual images uses a slightly more complex structure, with carefully sized images, but saves making a large composite image with carefully sized and placed images. With this method it’s not possible to use the mouse with the waveform display to select a new waveform.