About Zita Reverb
Unless you are a Linux/Ubuntu user you may not be familliar with the Zita Reverb. It’s a reverb effect that combines elements of Schroeder and FDN reverberators in a complex matrix of delays, all-pass comb filters and damping filters.
The Zita reverb has two separate delay times for low, and mid/high frequencies. There is a crossover frequency control to set the frequency where low becomes mid frequency range. The mix between the two reverb bands can be varied, as can the EQ for the frequency bands.
The mixer also has a pre-delay time adjustment. Pre-delay is the amount of time before the onset of the reverberation effect.
Longer pre-delay settings will add more depth to the reverb when the dry signal is up front in the mix.
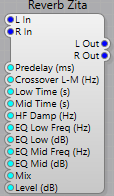
Plugs.
Left Hand Side:
L in:- Left hand side audio input.
R in:- Right hand side audio input.
Predelay (ms):- Sets the Pre-Delay time in milliseconds. Pre-delay is the amount of time before the onset of the reverberation.
Crossover L-M (Hz):- Sets the Low to Mid crossover frequency.
Low Time (s):- Sets the low frequency reverb decay time. Time (in seconds) to decay by 60db in the low-frequency band.
Mid Time (s):- Sets the mid frequency reverb decay time. Time (in seconds) to decay by 60db in the mid-frequency band.
HF Damp (Hz):- Sets the HF Damping frequency.
EQ Low Freq (Hz):- Sets the low frequency reverb boost/cut EQ frequency
EQ Low (dB):- Sets the low frequency reverb boost/cut EQ amount
EQ Mid Freq (Hz):- Sets the mid frequency reverb boost/cut EQ frequency
EQ Mid dB:- Sets the mid frequency reverb boost/cut EQ amount
Mix:- Sets the mix between direct signal and reverb.
Level dB:- Sets the output level in dB.
Right Hand Side:
L Out:- Left hand side audio output.
R Out:- Right hand side audio output.
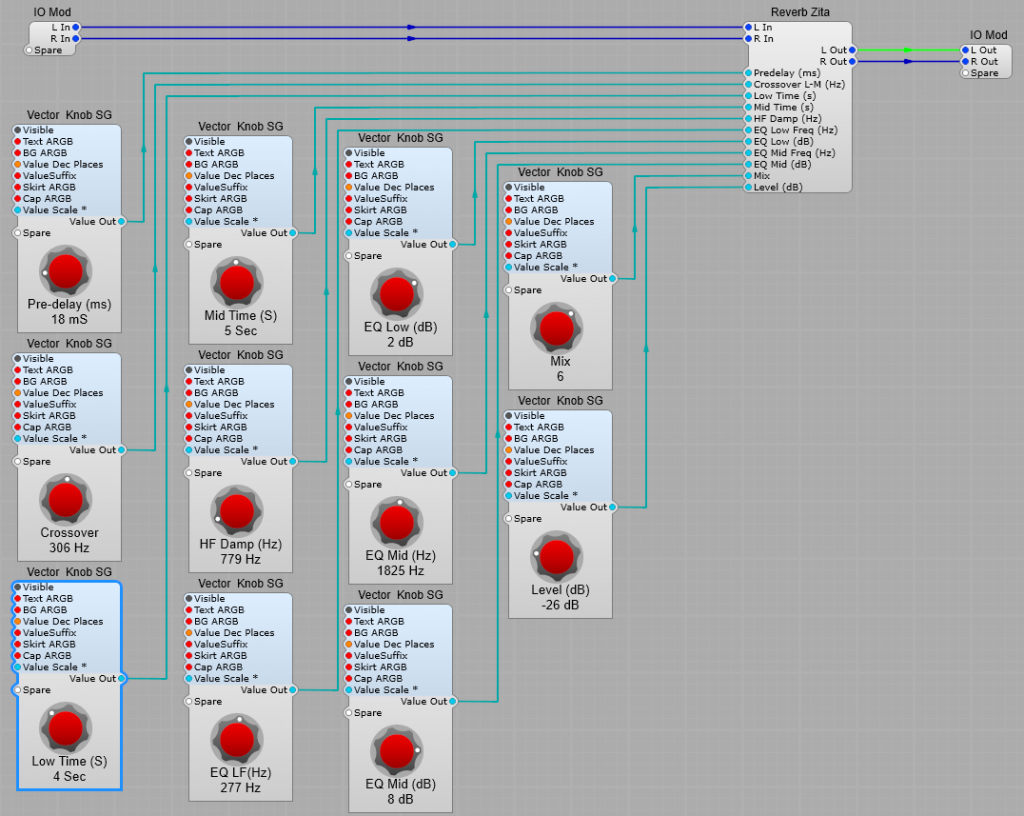
Structure of a typical Reverb effect prefab using the Zita Reverb module.
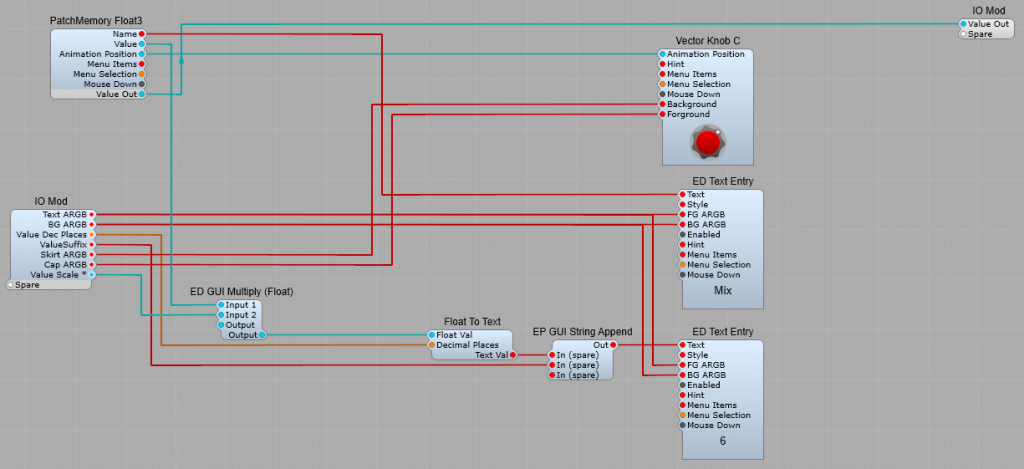
Structure of the Float output knobs.
Nothing very special-just that the Float to Volts converter is removed, and the DSP Value out is taken directly to the IO Module plug.
Setting up the control ranges.
There are no conversions needed for the controls and the value readout as the Float values are either Float Value=dB, or Float Value=Hz. Keeps things nice and simple.
Pre-delay: A good range is 0 to 200 (mS).
Crossover: 10 to 2000 (Hz).
Low Time: 0.5 to 10 Sec (Don’t leave the “Low” as 0, the reverb will crash until the audio/plug-in resets).
Mid Time: 0.5 to 10 Sec (Don’t leave the “Low” as 0, the reverb will crash until the audio/plug-in resets).
HF Damp: 10 Hz to 10 kHz. I have seen the upper frequency suggested as 20 kHz, but that seems unnecessarily high to me.
EQ Low Hz: 10 Hz to 1000 Hz.
EQ Low dB: -20 dB to +20 dB.
EQ Mid Hz: 1kHz to 10 kHz.
EQ Mid dB: -20 dB to +20 dB.
Mix: 0 to 100.
Level (dB): A good range would be -40 dB to +10 dB.
Typical Settings.
Predelay: amount by which the “wet” signal is delayed relative to start of the “dry” signal. The range is usually between 0 to 200 ms, a good default is 60 ms.
Crossover Freq: The crossover frequency separating the low and middle frequencies, The range is 10 Hz to 1000 Hz, a good default setting is 200 Hz.
Low Release: The time for the reverb to decay by 60 dB in the low-frequency band. The range is 0.1 to10 seconds, a good default setting is 3 seconds.
Mid Release: The time for the reverb to decay by 60 dB in the mid-frequency band. The range is 0.1 to10 seconds, a good default setting is 2 seconds.
Damping Freq: The frequency at which high- and mid-band decay release times are equal, The range is 10 Hz – 10 kHz, a good default frequency is 6 kHz.
EQ Low Freq (Hz): The center frequency of the Low EQ, Frequency range is 10-1000 Hz, a good default is 315 Hz.
EQ Low (dB): The peak level of EQ section 1, The range is from -20 to +20 dB, default setting 0 dB.
EQ Mid Freq (Hz): The center frequency of the Mid EQ, Frequency range is from 1 kHz to 10000 Hz, a good default setting is 1500 Hz.
EQ Mid (dB): The peak level of Mid rangeEQ, Range between -20 to +20 dB, default 0 dB.
Dry/Wet Mix: percentage, 0 (all dry) to 100% (all wet), a good starting point for an instrument is 50% (see below).
Tips for using Zita Reverb.
Use the Low Time and Mid Time settings.
Adjust Low Release to control the tail length for low frequencies, and Mid Release for high frequencies. The ability to adjust these separately is the main distinctive characteristic of the Zita reverb vs. other reverbs.
Damping.
Increase Damping Freq for a bright sound, reduce for a dark sound (this also reduces tail length). Hint: excessively bright reverb sounds un-natural as high frequencies decay more rapidly than low frequencies.
EQ Settings.
Note: Be careful with the Low EQ settings as these can make your final sound a bit “boomy” at the bottom end- I have seen this as a criticism of Zita reverb being “boomy”, it’s not if it’s used with careful attention to the LF controls.
Experiment with the EQ controls to balance tail length and tonal balance that suits your music. Don’t be afraid to experiment.
Pre-Delay.
If the idea of pre-delay seems confusing at first-you’re not alone, it took me a while to grasp it too!
The Predelay setting allows you to delay the start of the wet signal (reverberated) relative to the start of the “dry” signal, to allow the dry signal to stand out in the mix with a clean “punch”. This keeps the mix from sounding “muddy”. Try using longer Pre-Delay time settings for creative effects.
Reverb Mix levels.
When using as an in-line effect on an instrument, you would normally keep the Wet Level below 0.5. Low values can be subtle but quite effective.
When using as a Send effect set the mix at 100% so you get the full range of control over the mix on the return level stage.
Leave a Reply