Stuck with a SynthEdit project?

Tag: Vector Knobs

The new Vector Knobs

Important note about the vector knobs:

Note: These knobs are not suitable for use in SynthEdit 1.4, although some have tried (with varying success) to use them in 1.4 it is really not recommended as you may well introduce “buggy” behaviour.
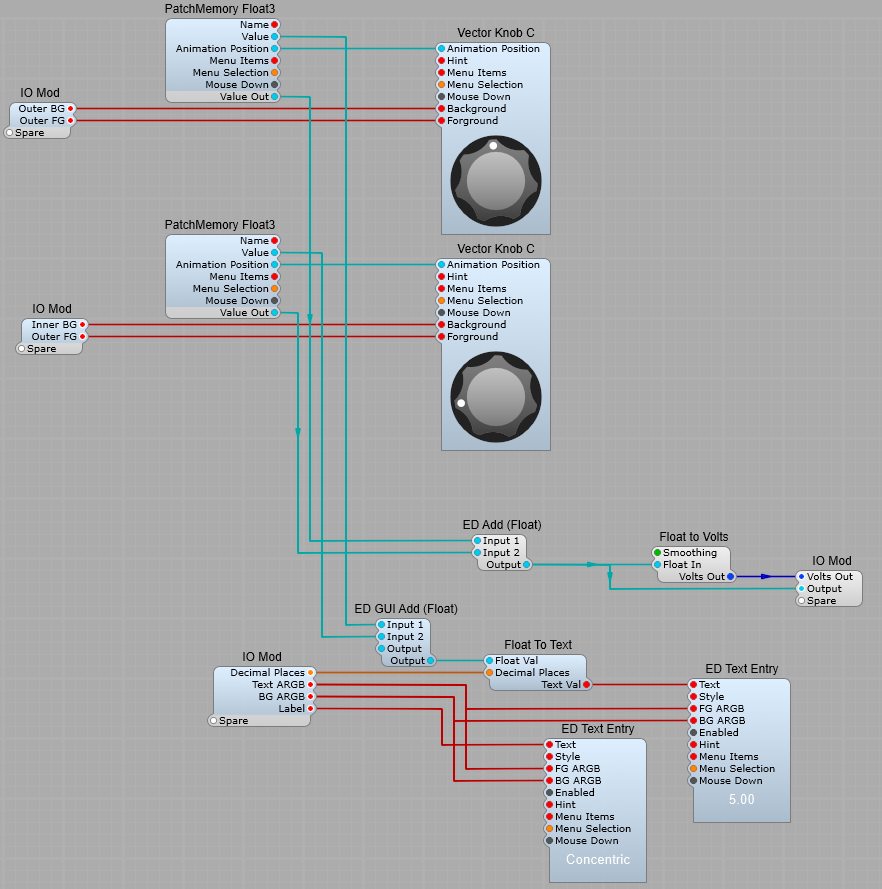
Vector Knob C

These control knobs have the advantage of being resizable. They can be used just as the old style “Image” knobs
With a few conversion and Patch Memories we can add text labels and a value readout, with customizable text colour and background. The colours for the centre of the knob (Foreground) and the “skirt” of the knob (Background) can both be changed too. Once the values have been set, they will be retained by the Patch Memories

Using the Vector Pan knob – adding a centre return “spring”.

There’s only one catch to be aware of here, the operation of Spring3 is different from the old Spring module. You must use the right hand Mouse Down input plug for it to work, the left hand plug is just a “through” signal that outputs the Mouse Down signal that the module receives. All we need do is enter the Reset Value of 0.5 in the properties panel. There is the option to enable or disable the spring action by setting and unsetting the On/Off plug. I have added the ED Joystick image as a pan position indicator (which can also control the Pan knob too…)

Vector Bar as a list option selector.

This uses a List to animation module to scroll through a list of options. The options are automatically taken from the List plug of the module it’s connected to.

Concentric controls in Synthedit.

This is a method of creating a combined control for a coarse and fine voltage setting. It’s quite simple and uses the newer Vector controls. This is the finished control (Sorry that flashy looking knob in the centre is V1.5 only but the principle will work with the plain Vector Knob B in V1.4)

V 1.5 Vector Knob

How it looks using Vector Knob B in V1.4

V 1.4 control Knob

This is the structure below (Inside a container). We are just taking the Animation position of each vector control through a PatchMemory Float 3 to convert it to a DSP float value, this will later be converted to Voltage for DSP modules.
The PatchMem connected to the vector ring has its maximum value set to 1 so that we get a range of 0 to 1 for this control, and 0 to 10 for the Knob C. The two values are added together using an ED Add (Float) module, and converted to Volts for controlling DSP modules. This means we get a total range of 0 to 11 for the control (shades of Spinal Tap), so by setting the Knob C’s PatchMem to a maximum of 9, we go back to our usual default of 0 to 10 volts. All you need to do once its working is to create a panel view, size and line up the two controls then lock the container view and save as a prefab control.
This enables us to use the main inner knob as a coarse 0 to 10 control, and the outer ring as a fine 0 to 1 control (or any range you wish).

Changing the control ranges:

Changing the ranges for the inner and outer controls is as easy as setting the Max and Min values in the properties panel. This is set up for 0-to-1 for the outer ring, and 0-to-9 for the knob, giving an overall range of 0-to10 Volts out.

Two similar concentric knobs (V1.5 only)

The principle is similar, however I have added a text readout for the output value, and a text label for the control. Colours of the knobs and the text are editable too.

So this sort of control is possible.

And this is how it looks in panel view.