Stuck with a SynthEdit project?

Tag: High CPU Usage

Sleep mode.

What is Sleep Mode?
Signals generally come in two categories:
1) A constant voltage such as the output from a slider control, which doesn’t vary unless we move the slider control. When the slider is not moved the module goes to sleep, as soon as there is any slider movement, the slider module will “wake” and process/send the change in value, promptly going to sleep again as soon as the value stops changing.
2) A constantly varying voltage, such as the output from an oscillator.
Most modules will detect if an incoming voltage is constant or changing. If it’s constant, or the input drops to zero they shut down audio processing to save CPU. All the time the input is changing the module is processing the signal, if the signal stops changing or falls to zero the module will sleep to save CPU.

Modules which are in sleep mode will usually issue a status signal telling the subsequent module(s) in the processing chain that it’s they can also shut down. Soon all of the modules in the chain will enter sleep mode.
There is a catch however, this is is that the CPU load may briefly spike
when a static signal changes, which can possibly cause an audio click or crackle if the system happens to be running at peak CPU load.
If the signal doesn’t demand isn’t processing audio, always use GUI modules instead of DSP to prevent the possibility of these glitches. And if suitable GUI modules are available, you must always calculate control signals on the GUI processing side.

Sleep mode in action.

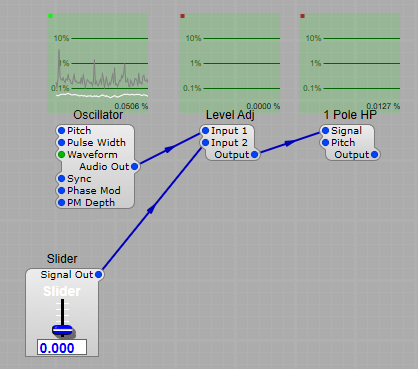
To see the sleep mode in action set up the following structure.
Once it’s set up right click on each module and from the “more” option select “Debug…” you’ll see these dark green windows pop up that show you the CPU activity level. The small green dot in the top left indicates that the module is “awake”, a dark red dot shows the module is in “sleep” mode, and the graph line shows CPU activity.
With the Level Adj slider set at 0 (hence a gain of 0 for the Level Adj) we can see that although the oscillator is active and using CPU, the Level Adj and the 1 Pole HP filter are in sleep mode.

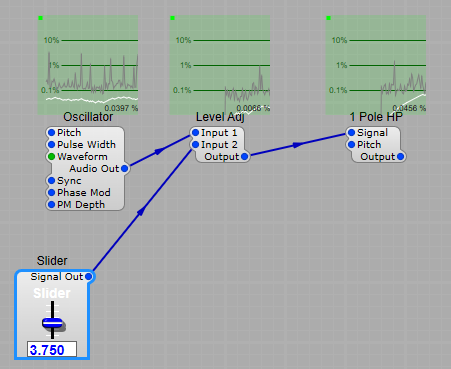
Now raise the slider slightly…
You’ll see both modules “wake” almost immediately. As soon as the Level Adj wakes up it tells the following modules “hey there’s activity-get ready to do some work”. The dots turn green and the modules start using CPU.
Stock SynthEdit modules will all detect sleep mode, but some third-party modules may not (note: most programmers do include sleep mode) because this function is not compulsory for SE. If you suspect a module is consuming more than its fair share of CPU power because your plug in project is clicking, glitching or stuttering, then Debug will help you track down either the module in question, or a point where for some reason your “wiring” is preventing sleep mode from working.

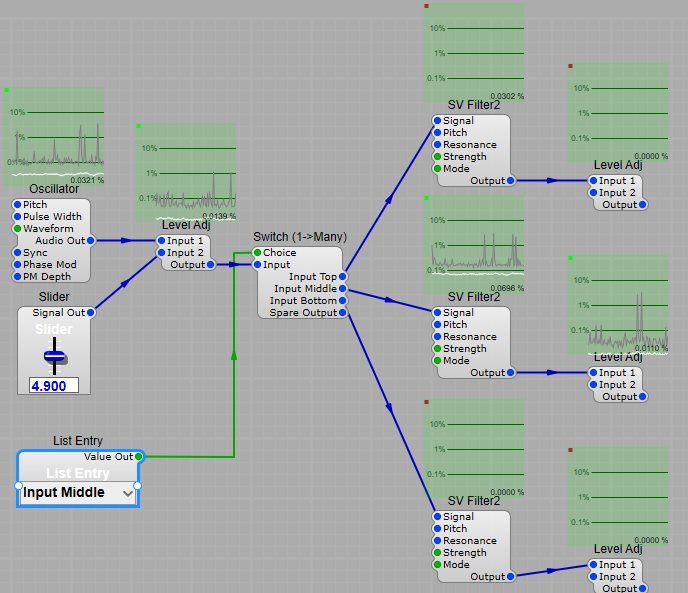
Why is this important? Consider the following, where we have three SV filters and we switch between each one at the output. All the modules are awake as soon as the first one wakes.

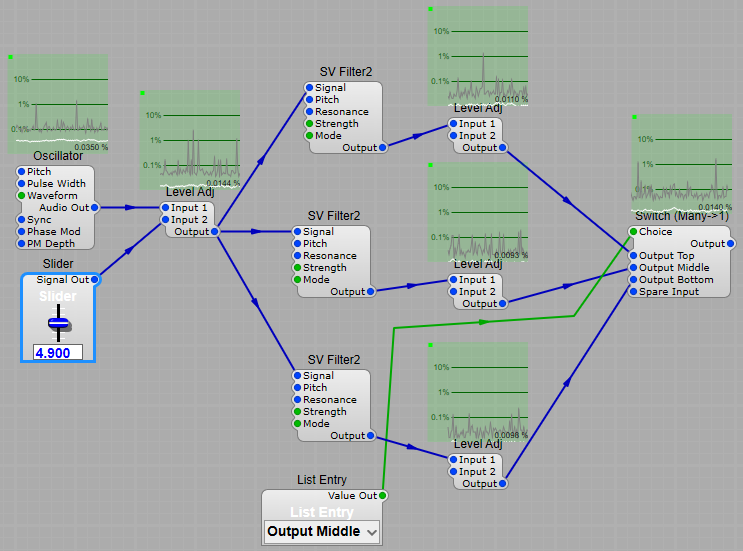
Now lets see what happens if we put the switch before the filters… Here we have selected the middle filter, and you can see that the only “awake” chain is the one after the middle filter. Because the Top and Bottom filters have no audio signals being sent to them they are still “Sleeping”, thus we save on CPU by only having the audio processing chain we need to use “awake” and leaving the others to “sleep on”. Try this out, and see each chain go to sleep, and wake as you switch between filters. It’s easy to see that switching the signals between the input of each filter rather than switching the outputs could have a big influence on how much CPU your plug-in will use.

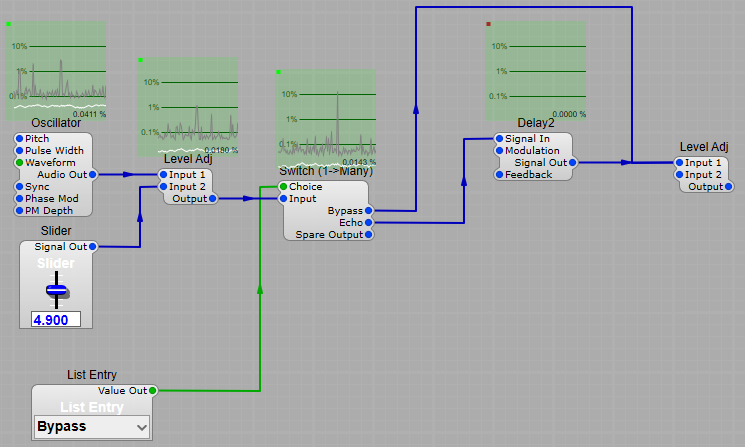
Effects need sleep too!

When putting in a bypass mode for an effect such as echo you should always consider sleep mode too. You can either just put a switch on the input, or both input and output, but not just on the output. The structure below is the best way to put in a bypass mode switch.
Note: Any form of delay module will not go into sleep mode immediately. Why? Because they can’t stop processing the audio till the last bit of echo or reverb audio has died down to a point where it is so low as to be unimportant, then the module will sleep. Otherwise the effect could cut off very abruptly if a module prior to the Delay went into sleep mode! We can’t wait for it to reach total silence. In theory it might never reach zero-or would take a very long time to do so at high feedback levels.

Reducing CPU usage in Synthedit and your VST’s.

SynthEdit is already highly efficient in terms of CPU usage, and has several features that automatically optimize the performance of your SynthEdit creations.
However, it can’t compensate for any errors that may be made in construction, so with complex projects you may start to experience some performance issues.
Common causes of high CPU usage:
1) Putting effects in the main Synthesizer container – this causes modules to use polyphony where it’s not needed, creating clones of modules which consumes CPU with no end result.
2) Hanging modules – they don’t sleep and hence they waste CPU
3) Oversampling – use with caution, this is very heavy on CPU usage. Make sure it’s really needed, used efficiently, and actually improves the output sound quality.

Keeping it under control.
CPU usage is very dependent on the way a synth is put together. Often there are two ways to achieve the same result, with vastly different CPU usage. The more efficient your projects are, the better they will perform.
DSP = more CPU cycles.
Any module that generates or processes audio signals will use more CPU than a module that doesn’t. Audio requires that the processor is handling data at the current sampling rate set in preferences.
In contrast sliders, knobs, and other controls or signals that don’t change often, like the MIDI to CV modules Pitch and Velocity outputs, can be considered control signals, which are handled in a different way, and at a much slower rate.
Not quite DSP.
An envelope generator module is somewhere in-between; during its Attack and Decay segments, it’s generating something close to audio rate data, and during the sustain section of the envelope, it’s generating a flat-line, control-rate signal.

1) Adding modules to the audio path is expensive in terms of CPU usage.
2) Adding modules to the control path is usually low cost in terms of CPU cycles.

Always keep effects outside of the main Synthesizer Container.
A frequent beginners error is to put a reverb module inside the synthesizer’s container, which will then get applied to each individual note played, potentially eating a large number of CPU cycles. What is usually intended, is just one reverb, applied to the merged output (the reverb is added outside of the container.) Always add effects outside of your main synthesizer container to keep them from “Going Polyphonic”. See below for how it should be done: Main Synthesizer container, followed by another container for the effect modules.

Where to place effects in your VSTs signal chain.

Polyphony is not simple.
Some modules force the signal into a monophonic format by default, for example;
Delay2, Level Adjust and Pan. When every clone shares the same settings and these modules sit at the end of the signal chain they will be forced into the Monophonic mode..
However putting these monophonic effects between polyphonic modules imposes polyphony on them. Say you’re dealing with the following setup shown below:

Example:
As it stands this won’t cause a problem, but then you decide to add a Filter after the Reverb JC module which is also Polyphonic after the monophonic effects, then forces all the modules in between the VCA and the Waveshaper, (Delay2 and Reverb JC) into polyphonic operation.

A badly designed VST the Moog filter will force the Delay and Reverb into being polyphonic

This is extremely wasteful of CPU resources, so either put the effects in their own container, followed by the filter, or put a voice combiner between the VCA and the Delay2 module as shown below. Even better would be to put the Delay2, Reverb JC, and the Moog Filter into their own container.

How to prevent modules from going polyphonic

MIDI to CV2 use.

Please, please, please put the MIDI to CV2 module in the main synthesizer container, but do NOT put it in it’s own container, or outside of the main Synth container. When you do this it causes all sorts of strange effects such as pitch rising with each note played, and velocity not working correctly.

Avoid “Hanging” Modules:

A hanging module is on that is connected “downstream” from the MIDI-CV module but has no output wires.  (See the example below)

Example of a hanging module

SynthEdit identifies this as the ‘last’ module in the voice and monitors it’s output. However this module has no output wire which causes SynthEdit to never “sleep” the voice. This situation results in very high CPU consumption. This can often happen if a chain of modules is deleted for a modification and one gets missed – be careful to select all the modules in a chain if you are removing it, you may have had two filters and been switching between the two for testing or something similar.
Also when you do have a situation where you’re switching between two filters don’t put the switch in the output like so:

How not to switch between filters

You just created a hanging module. When you switch between filters, the de-selected one becomes a “hanging” module and never sleeps.
The correct method is to switch input and output as shown below, with the switches controlled by the same List Entry module. The two extra control modules use far less memory and CPU than the hanging module in the previous method, as when you switch filters, the de-selected on is removed from the signal chain and goes into “sleep” mode conserving CPU.

The correct way of switching filters

De-Normal Numbers.
De-Normal numbers should now no longer be an issue in Synthedit as there are FPU flags set to remove them.
Taken from a post on synthedit@groups.io
Q. “Jeff, are you perhaps setting some FPU flags to flush Denormals in SE ?”
A. At least on Windows (I might include mac intel too I think…)
controlfp_s( 0, _DN_FLUSH, _MCW_DN ); // flush-denormals-to-zero mode.
This is why the Denormal diagnostics modules have been removed from the Synthedit modules.
Thanks go to Elena Novaretti for pointing out this error to me.

Oversampling, what it is.

Oversampling should be used only when it’s really needed for an improvement in sound quality, as it pushes up the CPU usage quite dramatically.
About Oversampling:
In signal processing, oversampling is the process of sampling an audio signal at a sampling frequency significantly higher than the Nyquist rate. Theoretically, a bandwidth-limited signal can be perfectly reconstructed if sampled at the Nyquist rate or above it.
The Nyquist rate is defined as twice the bandwidth of the signal.
Oversampling is capable of improving resolution and signal-to-noise ratio, and can be helpful in avoiding aliasing and phase distortion by relaxing anti-aliasing filter performance requirements. A signal is said to be oversampled by a factor of N if it is sampled at N times the Nyquist rate.
For example, we have a system with a Nyquist limit of 44kHz, but it’s actually sampled at 88kHz, then it would be oversampled by a factor of 2, so if the sample rate is taken up to 132kHz then we are oversampling by a factor of 3.
Why oversample?
There are four good reasons for performing oversampling:
1) To improve anti-aliasing performance (the higher the sample rate, the lower the level of the aliasing by products)
2) To increase resolution
3) To reduce noise and
4) It’s much easier to reduce aliasing distortion during sampling than after the sampling process (in fact reducing it after sampling is almost impossible).
Oversampling and Anti Aliasing.
Oversampling can improve anti-aliasing.
By increasing the bandwidth of the sampling system, the job of the anti-aliasing filters is made simpler. Once the signal has been sampled, the signal can be digitally filtered and then down sampled to the required sampling frequency.
In DSP technology, any filtering systems associated with the down-sampled audio are easier to put in place than an analogue filter system that would be required by a non-oversampled audio design.
Oversampling and effects.
Controversial subject, but an effect really isn’t going to get much of an improvement in sound quality (if any), but your CPU usage is going to increase substantially.