Synthedit help and tutorials

Stuck with a SynthEdit project?

Page 9 of 20

Resizable slider control.

The stock Slider Control in Synthedit has one major disadvantage- It’s not resizable. This project uses third party modules, and can be re-sized by editing its panel view. Note: Resizing the actual slider knob does mean creating a new .png file for it. This control also has the option to “spring” back to a default value, which can be useful, you could use it as a pitch bend slider control for example.
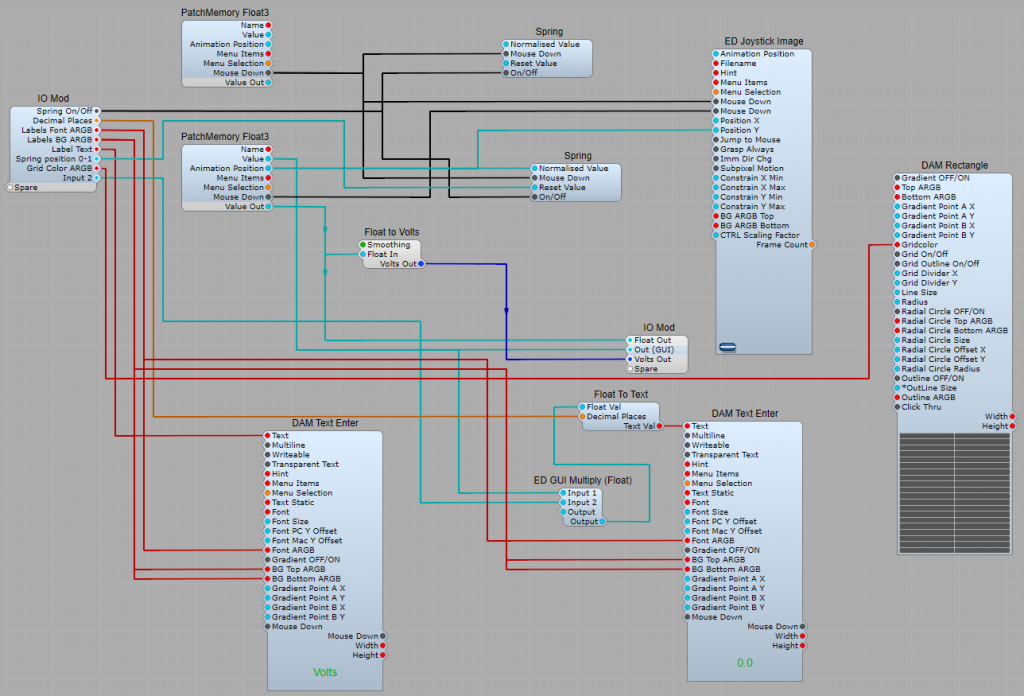
The Joystick/Slider module.

The ED Joystick Image control is used for the slider control itself, there are few properties settings to note, see below:
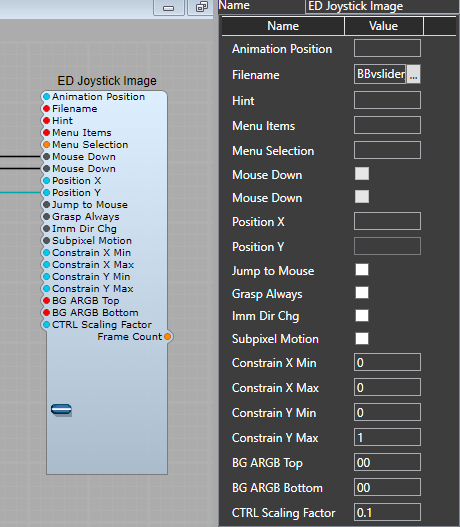
Setting Constrain X Max to 0 stops any horizontal movement of the control by locking it to the 0 position. Leave the Constrain Y settings as Min=0 and Max=1 as we want the full range.
Ctrl Scaling factor sets how fine the control movement is when holding the Ctrl key down and moving the slider. Both the backgrounds are set as 00 for the Alpha (transparency) level so the rest of the ARGB setting can be left blank.
The Mouse Down plugs are connected so that the control will be returned to it’s default position when this option is selected.

The control background and scale grid.

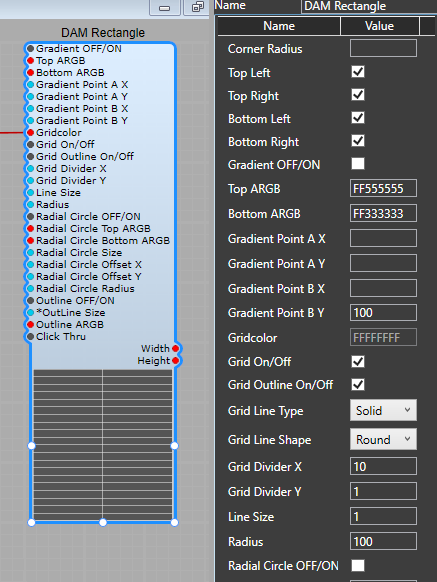
The background for the control is supplied by another third party control, the DAM Rectangle, which allows us a resizable background, outline and grid with control over the colours of the background and grid, the settings are shown below.
Although I have left the background colour as preset, you could easily link the Top ARGB and Bottom ARGB to allow these as user settings.
The “Spring”.

This is the section that allows us to have a position that the control automatically returns to our user determined default position as soon as the left mouse button is released. Although we have two Spring modules connected only one needs a Reset and normalized value set ( the Y position) Note: Although it seems like only one Spring module is needed this will not work without both connected as shown.
The reset value is the position we want the control to return to, and it is the normal GUI float range of 0 to 1, so to return to the mid position a value of 0.5 must be set for the “Spring Position”. This is independent of any values given to the Min Max values for the control, and will always follow this 0 to 1 scale.

The label and value display.

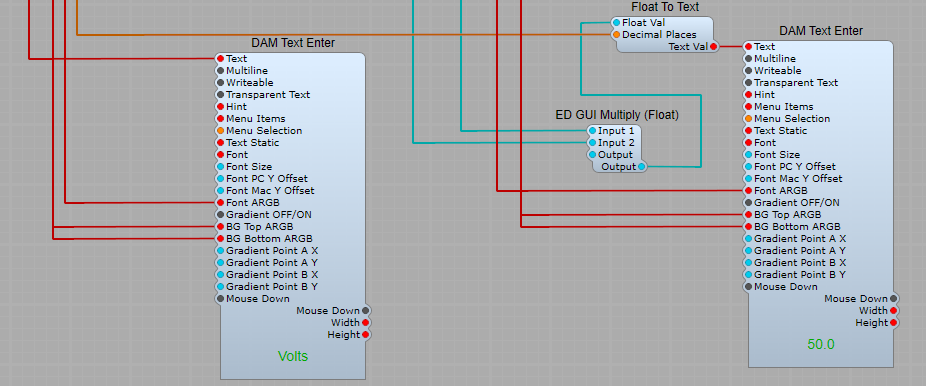
Another third party module is in use here, the DAM Text Enter module as this gives us greater control over the text formatting than the stock SE text modules.
Float to text is used to for the value readout with an ED GUI Multiply (Float) so re can re-scale the readout ( for example you want to convert a range of 0 to 10 to a range of 0 to 100%- this only affects the display, not the Volts/Float outputs.
Output.

I have Included a GUI Float output, a DSP Float output, and a Volts output. The Float to Volts conversion is set to smooth (30mS).

Resizing the control.

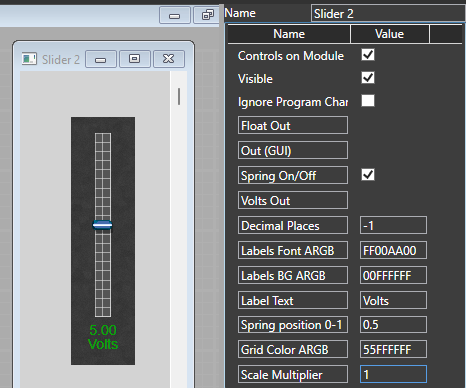
All that need to be done is open the Panel View then drag the relevant controls to their required sizes, then lock and close the panel view.
The panel view and control settings are shown below.
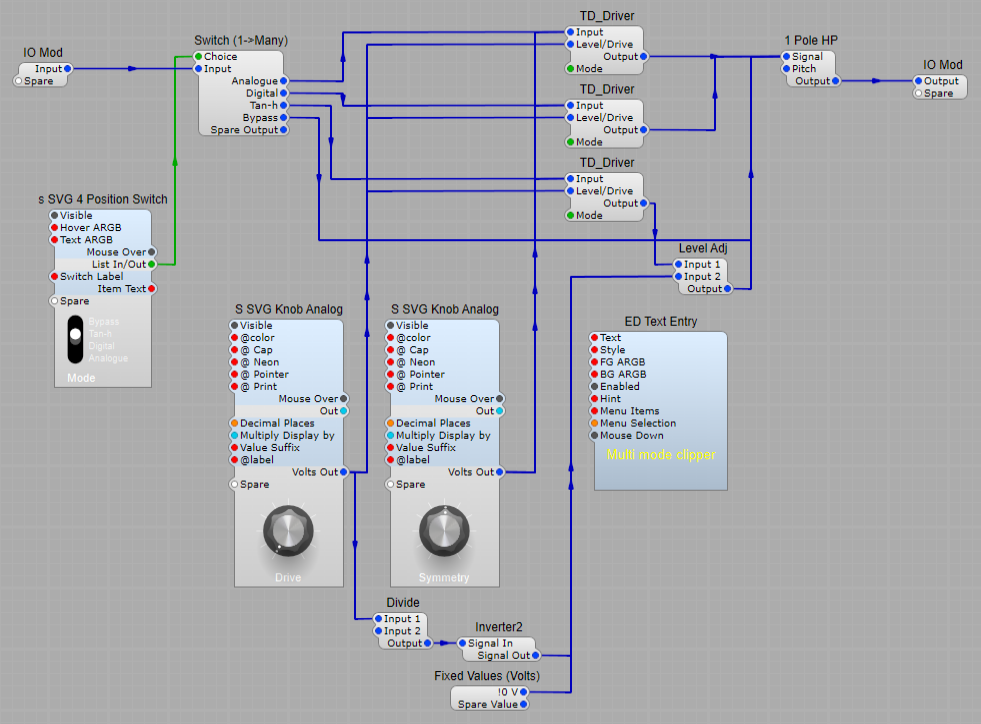
Multimode clipper

This small structure uses a third party distortion module, but is otherwise quite simple. It uses three TD_Driver modules set into different modes. I found the best ones were:
1) Analogue (a softer distortion, more akin to an overdriven valve pre-amp)
2) Digital (a harsher distortion, like a transistor “fuzz box”)
3) Tanh (a softer sound, that can be used as a saturator)

The “Drive” control is set with its Min/Max range set to Minimum 8 V and a Maximum of 40 V this give a nice useful range of effect from almost no distortion, to full blown clipping in the Analog and Digital modes.
The divide and inverter modules are used to control the output level when the Tanh mode is selected, otherwise the output can quickly exceed the default SE audio range causing unwanted (and very unpleasant) clipping. The divider is set with the Input2 plug set to 8. The divider/inverter circuit converts the +8 to +40 range to the correct voltage when applied to the +10V applied to the Input 2 plug of the Level Adj module to keep the audio signal level from the Tanh TD_Driver fairly constant in line with the other two modules.
Symmetry:
The symmetry control is set with a Minimum of -2.5 volts, and a Maximum of 2.5 volts, and fed to the input of each control. This allows us to control whether positive , negative or both polarity peaks are clipped. This allows us more control over the type of harmonics (odd/even) that are produced. The TD_Driver module does have asymmetric modes, but I found this method more effective and controllable than these built in modes.
HP Filter:
The 1 Pole HP filter in the output is in kHz/Volt mode, and set to a pitch of 0.001 to prevent any DC offset appearing in the output. we are really just using it as a DC blocker.

Note: Although I have used Sasha’s SVG controls for the design, you can use the controls supplied with SE just as well.

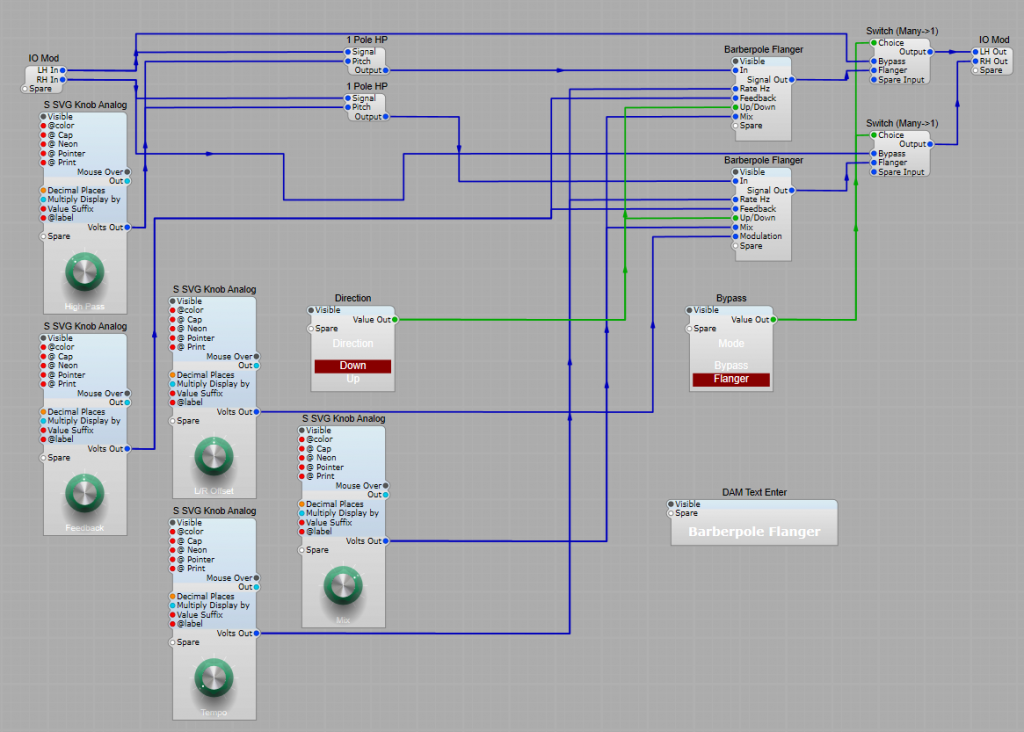
Barberpole Flanger effect.

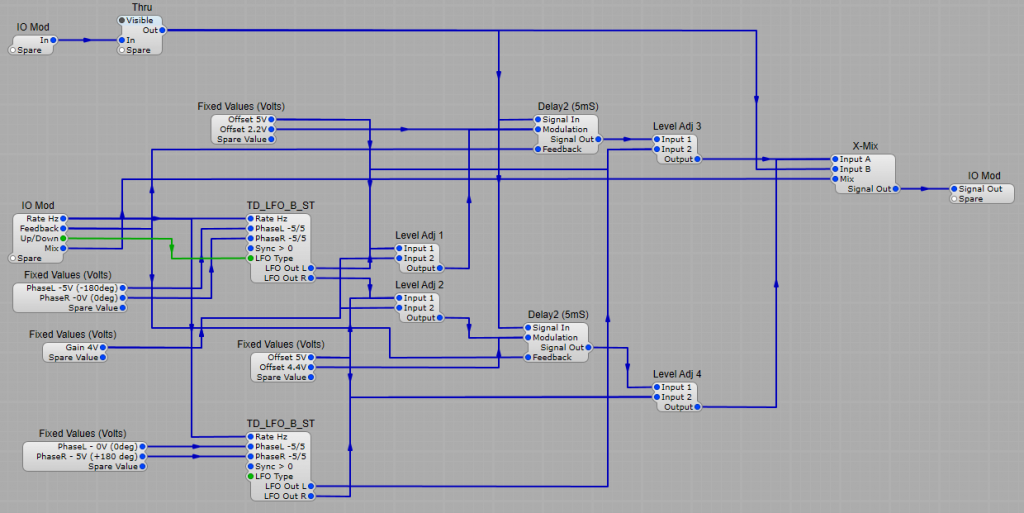
A Barberpole Flanger produces an flanging effect that like a Barberpole sign appears to have a continuously rising or falling “pitch”.

This can be achieved in SynthEdit but needs a little attention to LFO phases and some offset voltages. You could use the stock Oscillators from SynthEdit but using the TD_LFO_B_ST cuts down on the number of modules, and makes setup a little easier. I have used Sasha’s SVG knobs for the Knobs, but you could just as easily use the standard knobs.

Looping Envelope generator in SynthEdit

I have seen this question a few times in various places, how to reproduce a looping Attack Decay envelope. I have not yet thought of a way to incorporate the Sustain and release sections yet… I have a feeling this would require some complex workings, or delving into C+ programming.

This is something that’s fairly simple even with stock modules. The trick is to re-trigger the ADSR2 when the output falls to 0 volts. We can do this with a combination of a Comparator and a Feedback – Volts module. Because the Feedback-Volts module introduces a small but unavoidable delay in the re-triggering signal we have to make sure that the Attack time is not too fast, otherwise we will only get two or three repeats before the timing goes astray and the re-trigger circuit stops working. For this reason I have placed a +1V offset on the Attack plug to ensure that the value never falls below the minimum Attack time for the structure to work correctly.
The loop timing is controlled by both the Attack and Decay times. The structure is designed so that as long as a gate voltage is present on the Gate input plug the envelope will continue looping.

If you wanted to allow a continuous operation them just add a switchable 10 V gate signal to the Gate input connection.

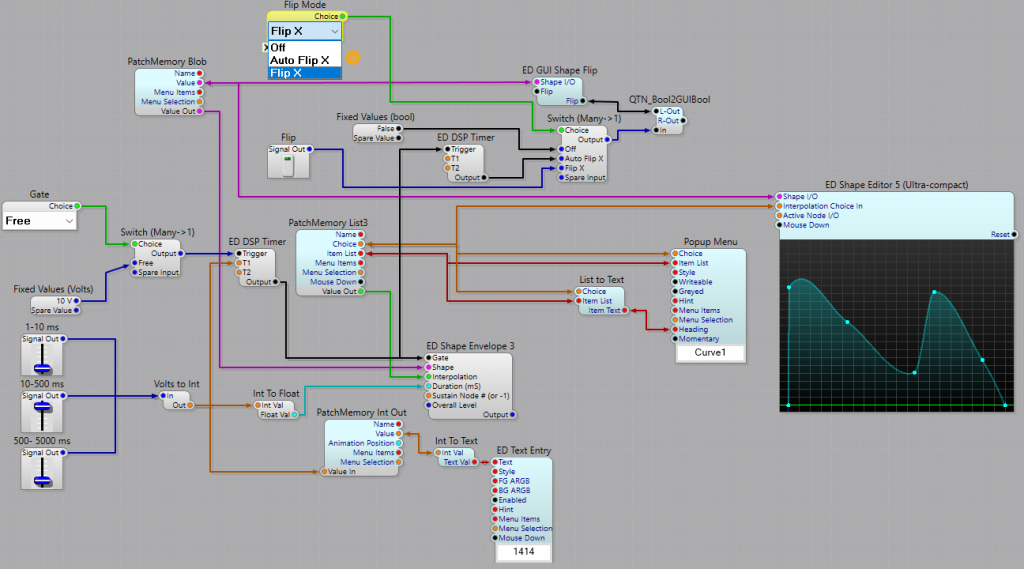
More complex, even drawable envelopes are possible, by using the structure below, but this is quite complex, and uses 3rd party modules from Elena Novaretti to reverse (flip) the shape along its x axis either manually or automatically.

Additive Synthesis part 2

Basic Structure

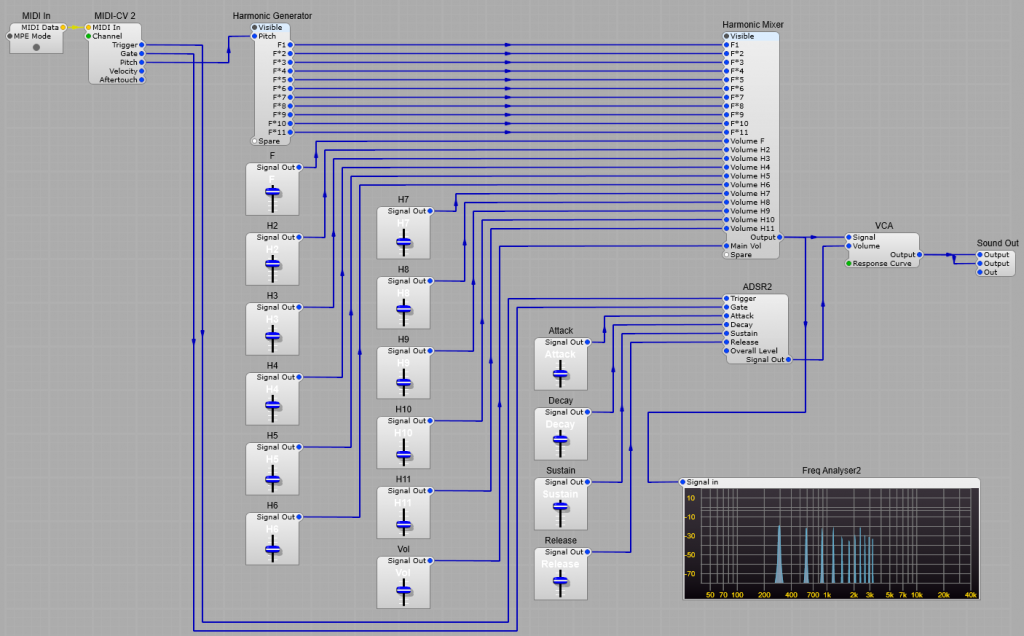
A basic Additive synthesizer such as the one I’m describing has one notable difference- no filter, and no waveform selection. In this design we’re doing all the timbral alteration by selecting the levels of the harmonics. The overall structure is shown below. I’ll break it down stage by stage.

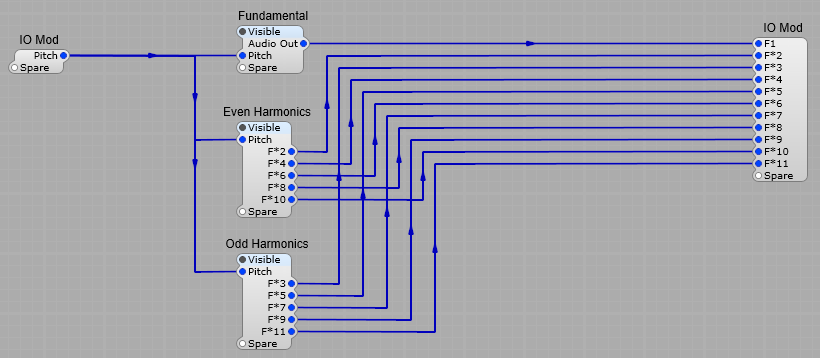
The Harmonic Generator.

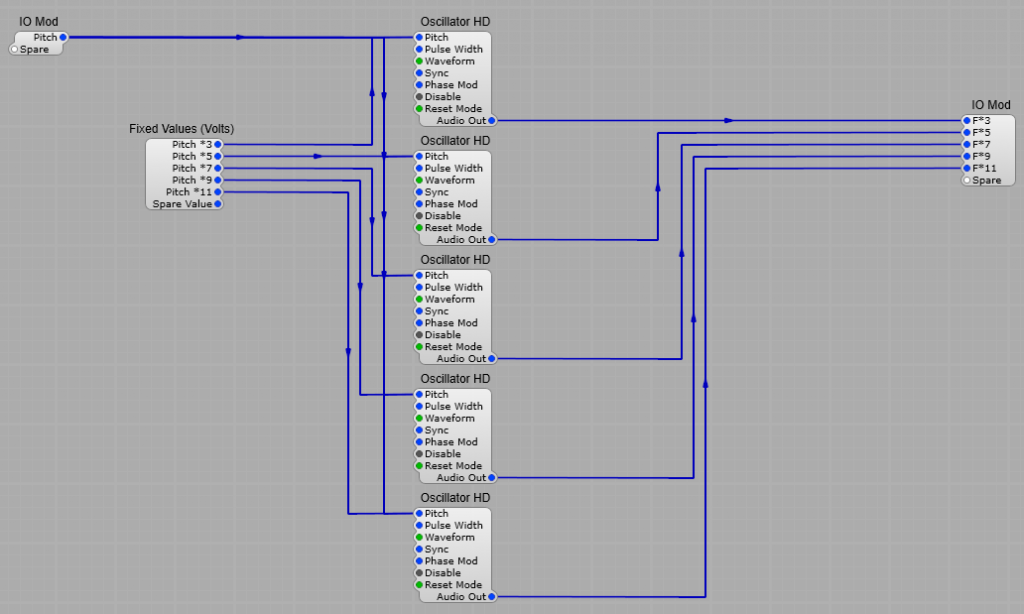
The Harmonic Generator container is our fundamental oscillator. This is the pitch that we are using for the note we want to play. Everything else is generated in our Even Harmonics Container and our Odd Harmonics containers.

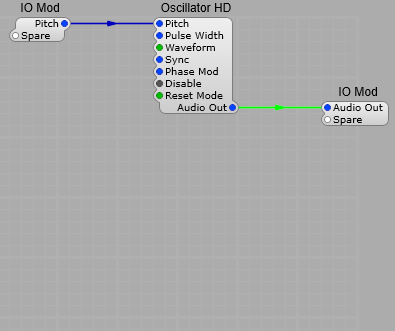
The Fundamental Oscillator.

This is simple, just an Oscillator HD module, with the waveform preset to Sine wave, pitch input and Audio Output.

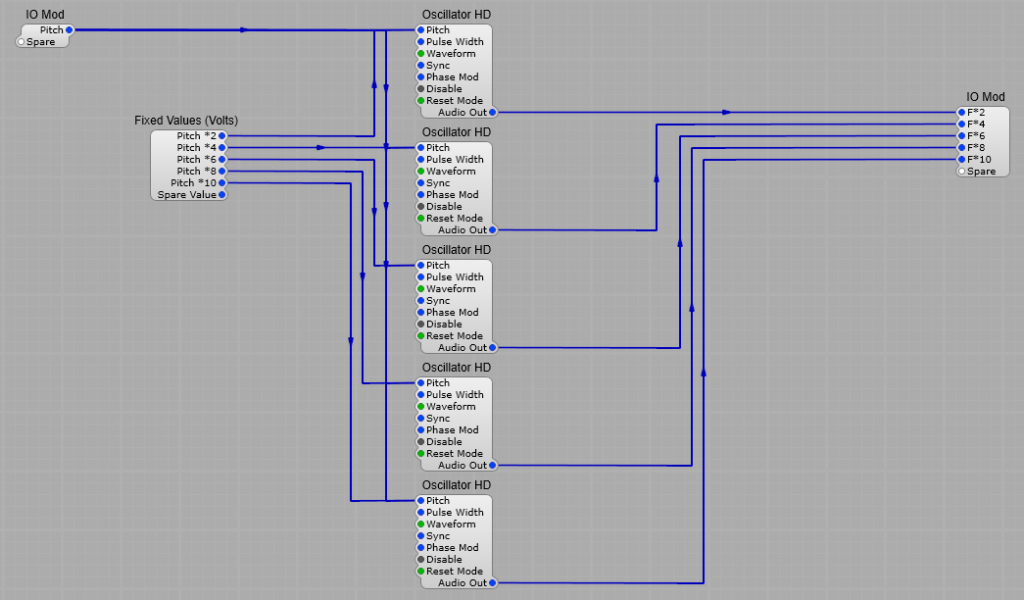
Even Harmonics.
These are our 2nd, 4th, 6th, 8th and 10th harmonics so for Standard A at 440 Hz Hz they will be; 880 Hz, 1760 Hz, 2540 Hz, 3520 Hz, and 4400 Hz. We use the same HD Oscillator module again set to a sine wave output. The harmonic frequencies are generated by the offset voltages in the Fixed Values (Volts) module, the voltages are as follows;
2nd Harmonic Osc 1 V
4th Harmonic Osc 2 V
6th Harmonic Osc 2.585 V
8th Harmonic Osc 3 V
10th Harmonic Osc 3.322 V

Odd Harmonics.
These are our 3rd, 5th, 7th, 9th and 11th harmonics so for Standard A at 440 Hz Hz they will be; 1320 Hz, 2200 Hz, 3080 Hz, 3960 Hz, and 4840Hz. We use the same HD Oscillator module again set to a sine wave output. The harmonic frequencies are generated by the offset voltages in the Fixed Values (Volts) module, the voltages are as follows;
2nd Harmonic Osc 1.585 V
4th Harmonic Osc 2.322 V
6th Harmonic Osc 2.807 V
8th Harmonic Osc 3.170 V
10th Harmonic Osc 3.459 V

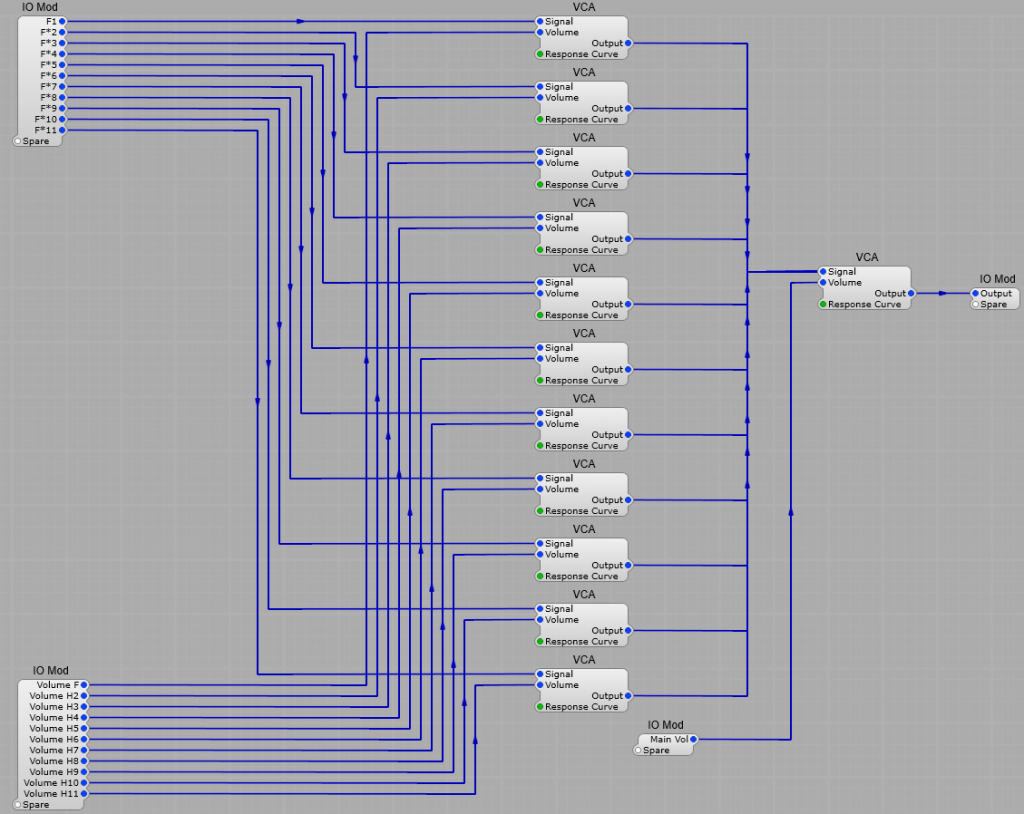
Controlling the levels of the Partials (Harmonics).

This is just an audio mixer. I have used VCA modules rather than Adjust Level modules for a more natural “feel” to the control over the levels.

The Final stage.

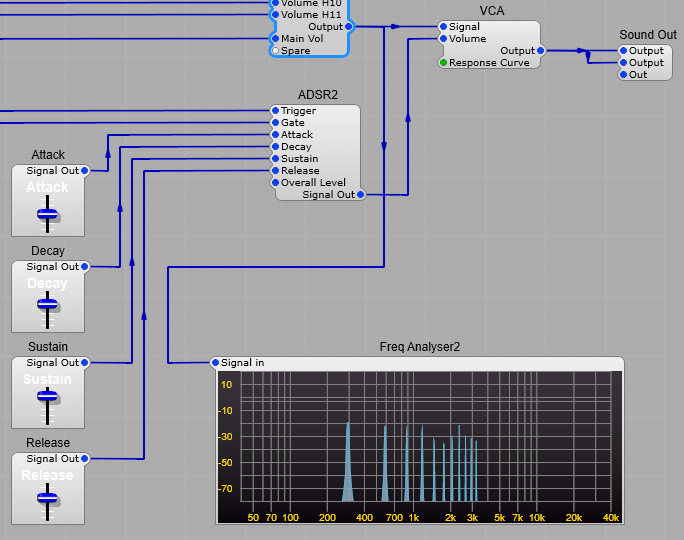
Here we are just using the standard Synth output of a VCA and ADSR module connected up as usual. The waveshaper was something I included to check that I was not getting any unexpected frequencies out of the Harmonic Generator.

Although I haven’t included any other modules such as Waveshapers, filters etc. there’s no reason not to include them and make it more of a hybrid synthesizer.

About dB and signal levels.

This is a subject that can cause a lot of confusion it seems.

The decibel (symbol: dB) is a relative unit of measurement equal to one tenth of a bel (B). It expresses the ratio of two values of a power or root-power quantity on a logarithmic scale. Two signals whose levels differ by one decibel have a power ratio of 101/10 (approximately 1.26) or root-power ratio of 101/20 (approximately 1.12).

dBV

The dB unit expresses a relative change in amplitude, but may also be used to express an absolute value as the ratio of a variable value to a fixed reference value. When used in this way, the unit symbol is often suffixed with letter codes that indicate the reference value.
For example, when using reference value of 1 V, a common suffix is “V” (e.g., “20 dBV”).

dB Scaling.

Two principal types of scaling of the decibel are in common use.
When expressing a power ratio, it is defined as ten times the logarithm with base 10. That is, a change in power by a factor of x 10 corresponds to a 10 dB change in signal level.
When expressing root-power quantities, a change in amplitude by a factor of x 10 corresponds to a 20 dB change in level. These decibel scales differ by a factor of two, so that the relative power and root-power levels change by the same value in linear systems, where power is proportional to the square of the signal amplitude.

The origin of the dB system of signal level measurement.

The definition of the decibel originated in the measurement of transmission loss and power in telephony of the early 20th century in the Bell System in the United States. The bel was named in honour of Alexander Graham Bell, but the bel is seldom used. Instead, the decibel is used for a wide variety of measurements in science and engineering, most notably for sound power in acoustics, in electronics, and in control theory.
In electronics, the gain of an amplifier, the attenuation of signals, and signal-to-noise ratios are frequently expressed in decibels.

How dB are used in SynthEdit.

In Synthedit we are using the dBV measurement, and the reference level of 0 dB is taken as 10 volts which is our maximum audio amplitude, after which audio signal clipping will occur. So if 10 V is our 0dB level, 5 V would be -6.0206 dB lower, and if we allow the signal to rise to 12 V we would get an increase of 1.583625 dB. But don’t forget these are the ratio between two signal levels. So we always need to define what voltage/wattage/sound pressure we are going to refer to.
There is a handy online online dB calculator which can be used to work out dB signal ratios.

Fortunately to save us doing a lot of messing around with math modules and formulae there are two third party conversion modules.
Important Note: These modules are not intended to convert audio signals, they will merely introduce distortion to the audio signal. They are purely for use with control voltages.
TD_dB2Volt:
To convert from dB back to the standard 0 to 10 volts scale, where 0 dB = 10 volts.

TD_Volts2dB
To convert the linear 0 to 10 volt scaling to a dB scale where 10 volts = 0 dB.

Stock Volts to Float dB conversion.

The stock Volts to Float2 module also gives us a Volts to dB conversion which can be selected from the Response plug.

An example of it’s use can be found in the stock Prefab VU meter which converts the 0 to 10 volts audio signal range to a dB scale and displays it.

Additive Synthesis part 1.

Additive synthesis is a technique that is little known and often poorly understood–especially compared to the more usual subtractive and FM synthesis methods of sound sculpting.
However when used effectively, it can be a powerful tool for making sounds that are difficult to create by other means. So what is additive synthesis , and how can we create an instrument that uses it? First we need to understand exactly what it is and how it works to create sounds.

How additive synthesis works.

To understand additive synthesis, let’s compare it to the better known, subtractive synthesis as used in the early Moog, Roland and ARP synthesizers.
A subtractive synth starts by generating a rich, full waveform, like a square or sawtooth wave. We then use filters, envelopes etc to tailor this sound, until we achieve the sound we want. This is the method along with FM that we are more familiar with.
Additive synthesis starts work from the opposite end. Rather than starting with a complex sound and changing it to our needs, we build our sound from scratch, one element at a time. This sounds dauntingly complex, but approached piece by piece it’s quite easily understood and managed.
A Hammond drawbar organ for example can be considered as a basic additive synthesizer We start with our strong fundamental frequency that give the tone its definite pitch. Lets take 440 Hz (A4) to start with, we can then start adding in more tones such as 2nd harmonic 880 Hz (A5), 3rd harmonic 1320 Hz (A6), and so on. Doesn’t sound so daunting when compared to a Hammond organ does it?

To further understand how this works, we’ll need to understand harmonics.
A very basic example is; as we have already seen, complex sounds can be approximated by layering sine waves at different frequencies (pitches) and amplitudes (volumes). These extra tones are known as “Partials” rather than harmonics (you’ll see why later).
A harmonic waveform, like a square or a sawtooth, contains a sine wave at the “fundamental frequency”: that’s the lowest frequency in the sound, and the one whose pitch we hear. It’s also called the first harmonic.
After this we have more layers of sine waves, or harmonics (partials) which all add together to create our unique sound. In this case they are at whole-number multiples of that fundamental frequency (x2, x3, x4 etc).
As an example: A 100 Hz sawtooth wave will contain the fundamental frequency at 100 Hz, and can then be created using more sine waves (or harmonics) at 200 Hz, 300 Hz, 400 Hz, and so on, gradually diminishing in level as we increase in frequency.
The number of upper harmonics that are present in a sound, and how loud they are, is what gives the sound it’s distinctive timbre.
A square wave, for example, features only harmonics that are odd-numbered multiples of the first harmonic: so, 300 Hz, 500 Hz, and so on (x3, x5, x7) but they are still whole number multiples.
In the illustration below you can see (especially in the lower frequency region) the difference in harmonic (partial) structure of the sawtooth and square wave signals, which are both set at 220 Hz.

Additive synthesis makes use of this, allowing us to build new sounds from scratch by controlling the frequency and amplitude (volume) of their harmonics.
Naturally, this is a long-winded way to make a square or a sawtooth wave: for that we just need to switch on our faithful Moog or ARP.
Stepping outside the boundaries.
However by getting involved in controlling the individual harmonic components of our sounds, we can leap far beyond the bounds of these familiar sounds, and create sounds that are less accessible using other forms of synthesis.
By changing the amplitudes of a sounds constituent harmonics over time, by using LFOs or Envelopes we can create some really interesting sounds that are completely unlike other instruments.
Inharmonic Partials.
A further leap forward is also possible by introducing inharmonic (not harmonically related) partials which are not whole number relatives, but partial numbers such as x2.5 for example, we can then create some really unusual sounds, such as percussion, bells, metallic sounds and some quite “other worldly” effects, we end up with sounds that are sometimes like ring modulation and some that are beyond what we can do with a ring modulator and two VCOs.

If you want a really in depth explanation of the principles of additive synthesis (warning: there’s a lot of advanced maths in this article- think Fourier analysis) then have a read of this Wikipedia article on the subject.

In the next post I’ll start to delve into how we can achieve some of this in Synthedit.

About LFOs- using the standard Oscillator.

An LFO is a low-frequency oscillator that is used to modulate a synthesizer controls automatically, and in a regular fashion. They are often used to modulate the filter cut-off frequency at a slow rate, for vibrato and for tremolo effects. Though it’s almost identical to an oscillator that produces audible waveforms, its frequency lies in the subsonic range between 10 Hz and 0.001 Hz. The most common waveforms are sine and triangle as shown below.


We can use the standard oscillator module to create an
LFO in SynthEdit.
Click on the module, and in the oscillator’s Properties window you will
see two modes for setting the frequency;
1 Volt/Octave,
1 Volt/kHz.
I recommend using 1V/kHz as it’s easier to work out your frequency ranges.
Since 1V = 1kHz, then 0.001V = 0.001kHz or 1Hz. It’s easier to work out 1 volt per kHz values, than using the 1 volt per octave formula below (unless you enjoy maths).

How low can you go? The stock SE Oscillator will (Since an update in 2019) go down as low in frequency as -1e27 kHz (0.00000000000000000001 kHz)… that’s well below 0.01 Hz.
An oscillator’s default output range is +5 to −5 volts. By adding a Level Adj
module in after the oscillator’s Audio Out plug you can adjust the
LFO’s output amplitude.
Note: If you make the range of the Level knob -10 V low to 10 V high, then when the Input 2 voltage is negative it will invert the phase of the waveform, and when it is positive the waveform will be in it’s normal phase.
Using the LFO is as simple as connecting to the Pitch plug of a filter (NB there are some filters such as the Butterworth EQ range that should not be modulated), the Pitch plug of an Oscillator (only small amounts are needed here) or the Volume plug of a VCA (it’s better to use a VCA than a Level Adj module).

By default this LFO will be “monophonic” this is because it is not connected to the MIDI-CV converter module. However we really don’t need to have a polyphonic LFO (and it would be a waste of valuable CPU resources too).
If you decided you really needed a polyphonic LFO, then you could connect the Phase Mod plug to the Pitch plug of the MIDI to CV module, and set the PM depth level to 0.
This is OK if you don’t mind having a few options an LFO wouldn’t normally have such as Pink/White noise. There is however a couple of excellent 3rd party LFO modules from TD modules which give you lots of extra options, see the TD LFO modules post.
We can also have even more complex modulation possibilities with a “complex LFO” by having a number of LFOs modulating each other.

Registration checking..

Registration system for VST plugins.

These modules allow you to have a simple Registration System for your VST Plugins by having a serial number that is directly linked to both the product name (name of your VST) and the registered user name.
The “Registration Check” module allows you to provide a basic system to register users of your plugins. The idea is you issue each user with a serial number. The serial is linked to the user’s name (or email).
Use two “User Setting – Text” modules, one to save the user’s name, and a second to store their serial. This data will be stored on disk and recalled any time the user loads the plugin. Each User-Setting-Text module needs a “key” which identifies what the setting is called. On the first User-Setting module, set “Key” to “Registration Name” or similar, and set the second module’s Key to “Serial” or similar. (Ref to the diagram below).
Registration Setting information will be saved to the following folders:
For Windows systems;
Windows C:\Users\UserName\AppData\Local\ProductName\Preferences.xml
For MAC OS systems;
MacOS ~Library/Preferences/ProductName/Preferences.xml.

Basic example.

In the example shown below a LED is used to indicate that a valid serial number has been entered.
In practice, you might choose to use this signal to restrict the features of your instrument, or to add periodic noise bursts etc.
To generate serials, use the “Registration Serial Generator” module
Important Note: You must not share this module with your end-users. 
Note: You must ensure you enter the same “random seed” into the Registration Serial Generator that you used in the Registration Checker. The seed should be different for each of your plugins (otherwise the same serials will activate all of them). Currently, it’s necessary to generate each serial number manually.

The Registration Checker in use in a VST:

Product Name:
Ensure you enter a unique product-name into the User-Setting-Text module at the time of creating your VST. Otherwise the system will mix up serials from different products and you’ll end up with a total mess.
The “Default” setting is not important, it can be left blank, however you can put a useful message in here such as “Enter User Name”. Note: If you are using the Password hide module there is no point as your message will become **********, so it would be better to use another Text Entry with the appropriate control labels.
Random Seed:
You must enter this Integer in the Registration Check module’s properties when programming the VST It MUST be unique to each plug-in you create (not for each one of the same type you sell though!)
User Name:
The user enters their User Name or E-Mail address in here, which they have supplied to you (email is best, the chances of two people having the same e-mail address are, well pretty remote).
Serial Number:
The user enters the serial number generated by the combination of their user name, and the Random Seed Integer.
In this example Text Entry 4 Changes to Registered = True when all the three variables match: Random Seed, User Name, and Serial Number. In practice you can use this to disable certain parts of the VST, add random noise bursts etc. which will then be removed when the correct registration details have been entered.

Hiding your passwords.

One more helpful thing you can add is the password hide. So if a user is making a video of something with the plugin the serial numbers are shown as asterisks after entry like ****** instead of 235256 for example if the registration screen is displayed on the main control panel.

Creating Passwords.

This just needs the Registration Serial Generator, and the Text Entry4 module to display the generated password.
All you need here is the Rego Name – this is ideally the clients email address, and the Random Seed Number.
Important: The Random Seed number must not be shared. The Registration Serial Generator must never be shared or left in the final VST.

User Setting – Text module.

Passes the relevant information to the Registration checker for validation.

Plugs:
Left Hand Side:
-> Product:- (Text) The Product name i.e. the name of your VST. This must match in both the User and Serial modules!
-> Key:- (Text) The Key value of User Name, or Serial Number. Leave as Default when programming.
-> Default:- (Text) Leave as Default when Programming.

Right Hand Side:
<- Value:- (Text) User Name or Serial number input from a Text Entry4 module by the end user.
<- Value:- (Text) User Name or Serial number sent to the Registration Checker module.

Registration Check: Module.

There are two versions of these GUI and DSP. They both check the combination of User Name, Seed, and Serial Number to ensure they are a valid match.

Plugs:
Left Hand Side:
-> Rego Name:- (Text) Input of the User name. Put a default value in the properties during programming.
-> Serial:- (Text) Input of the Serial Number. Put a default (false obviously!) value in the properties during programming.

Right Hand Side:
<- Is Valid:- (Boolean) Returns a value of “True” if all the conditions match.

Properties:
♦ Seed:- (Integer) This is your random Seed Number for your VST module to identify it. This MUST be a unique number entered into the modules properties during programming of your VST. It must never be made public.

LED2 without PatchMem

By using a third party module it is possible to avoid using a PatchMemory Float Out3 module in the LED2 control. It can be replaced with a QTN_Float2GUIFloat, to convert from DSP Floating Point to GUI Floating Point.
By setting Input 2 to a value of 10 V the LED will “Illuminate” at 5 V on the Signal In plug.
Note: If you set the Input 2 plug to 0 the LED will always be “On” (You cannot divide by zero, so the module will not provide a valid output.
Note: If you want to provide a quick and easy “Clipping detection” LED, then Set Input 2 to 1V, and change the Response plug on the Volts to Float module to “Clip Detect”. This will provide a fast method of clipping detection.

By adding another Divide module connected to Input 2 of the original Divide module, and setting this new module with an Input2 value of 2V we can then provide a second input with which to set the voltage at which the LED “Illuminates”.

Colour changing LED.

We can also add another similar input chain to give control over the LED colour. If the Input2 of the divide is set to 10 this will allow an input voltage of 0 V to 10 V to control the colour of the LED. If you want to colour change in response to a variable voltage I would suggest setting the Response of the Volts to Float to at least 20 Hz to avoid the colour change looking “stepped”. You can see this in action by connecting up a slow running oscillator, but don’t forget that this will give a -5 V to +5 V voltage swing, so you’ll need to ad a 5 V offset to the colour plug to get the correct range.

« Older posts Newer posts »