Synthedit help and tutorials

Stuck with a SynthEdit project?

Page 18 of 20

Using Ring Modulation in SynthEdit

What is a Ring Modulator?

A ring modulator multiplies two audio signals together to create two brand-new frequencies which are the sum and difference of the input frequencies.
What does all that mean, though? 

A ring modulator is basically a VCA with a special modulation input. On a normal VCA, you want complete silence when there is no CV, so it won’t let any carrier signal pass when the modulation signal is 0 (or below). Negative modulation signals are just ignored in a VCA. But in a ring modulator, on the other hand we want it to pass the carrier when the modulation signal goes negative as well (see below). For this reason they are also known as “Balanced Modulators”

This makes Ring Modulation different from the modulation we get from a VCA because it also has the added effect of cancelling the carrier frequency from the output signal, leaving only the sum and difference frequencies.
The frequencies from both the carrier (Input 1) and Modulator (Input 2) are not present at the output of the ring modulator, but two new signals (sidebands) will be generated at the difference and sum frequencies for the two inputs. The more complex the frequency spectrum of the modulator signal, the more sidebands that will be produced.
What does it sound like? Well just think of the classic Dalek “Exterminate” from Dr Who…that’s a normal voice passed though a ring modulator with a 30Hz sine wave, you can also create bell like sounds and some really otherworldly discordant sci-fi film type effects.

Comparison of Ring Modulation and Amplitude modulation at various frequencies.

1 kHz Modulator 3 kHz carrier.
Note how the 3 kHz signal has disappeared from the ring modulator’s output, and two new frequencies (AKA Sidebands) have appeared these are;
3 kHz – 1 kHz = 2 kHz, and 3 kHz + 1 kHz =4 kHz.
However the Amplitude modulated signal still contains the 3 kHz carrier, and more sidebands on to of the 2 kHz and 4 kHz.

2 kHz Modulator 3 kHz carrier.

3 kHz Modulator 3 kHz carrier.

4 kHz Modulator 3 kHz carrier
Note: This set of spectra looks odd, 3 kHz + 4 kHz = 7 kHz, is fine and it’s present which is OK. But where has the seemingly unrelated 1 kHz sideband come from? well 3 kHz – 4 kHz = -1 kHz, and a negative frequency just isn’t possible – so it gets “reflected” back from 0 up to 1 kHz. This always applies if the result of the
carrier- modulator equation results in a negative number.
(Well as far as we know negative frequencies don’t exist… and if they do I don’t want to think about the implications or the physics, it makes my head hurt!)

5 kHz Modulator 3 kHz carrier.

As you can see from the frequency spectrums above, the 3 kHz carrier is never present in the ring modulators output signal, but is always present in the amplitude modulators output.
Note: When the carrier and modulator are at the identical 3 kHz frequency there is only one 6kHz signal present in the spectrum, this is because 3 kHz + 3 kHz = 6kHz, however (you can probably guess this) 3 kHz – 3 kHz = 0 Hz. This is obviously DC so we can ignore this in fact we really don’t want it, so to prevent any DC in the output, not to mention any LF growls, rumbles or cross-mod it’s a good idea to put a high pass filter in the output at say 100 Hz cut-off frequency.

Using the Synthedit Ring Modulator.

There are already a choice of some Ring Modulator SEM’s. This is a complete module using the stock SynthEdit SEM.
We can make a quite good Ring Modulator unit with just a few other modules added on.
1) The standard container module with an Input IO Mod and an Output IO Mod.
2) Add an internal Modulation oscillator using an Oscillator with a Tuner Module. Connect the Pitch control Plug to a Spare plug on the Input IO Mod.
This is so we can control the modulation oscillator using either the keyboard, or some other control voltage source.
3) We switch the Modulation source from internal to external using a Switch Many ->1 module
4) In the properties panel rename the Two Input plugs, we have used “Internal” and “External” so we get a meaningful choice in the List Box.
5) Feed this to the Input 2 of the Ring Modulator, and connect Input 1 of the Ring Modulator to the Spare plug on the Input IO Module.
6) Connect a Level Adj module to the Output plug of the Ring Modulator using Input 1, and a Slider Control to the Input 2 of the Level Adj Module.
7) Select the Slider Control, and in the Properties panel give it the name “Output level”, and a Maximum value of 20. This is to compensate for the output of the Ring Modulator being a lower signal level (±5 volts, instead of the usual ± 10 volts).

Comparing the SE Ring mod and the TD Diode Ring Mod.

As you can see below there’s a noticeable difference in the frequency spectrum from the two Ring Modulators, the standard SE gives a cleaner harmonic spectrum of the sort you would get from a modern Balanced Modulator chip, and the TD_RingmodDiode module has a “dirtier” frequency spectrum like you would get from a diode modulator with it’s inherent distortion. For those with an electronics background the diode modulator will have a region of voltage where the diodes are not conducting (0 to +0.3 Volts for Germanium diodes, and 0 to +0.7 volts for Silicon diodes) so there will always be a small portion of the audio that is not passed through the modulator causing a small amount of a “crossover” type harmonic distortion.

Phase Distortion synthesis in SynthEdit.

Phase Distortion Synthesis was pioneered by Casio in the 1980’s and is based on the idea of distorting the playback phase of a sine wave.

Phase distortion synthesizers like the Casio CZ-1000 are characterized by a very clean sound, similar in some cases to the Yamaha DX-7. The Casio’s 8-stage envelopes for Pitch, Wave shape, and Amplitude were superior to most synthesizers at the time. The main drawback of the Casio was a lack of velocity sensitive keys.
Of course with SynthEdit, you can use the Velocity output of the MIDI to CV module to improve the playability of the Casio sound. Vince Clark (of Erasure) used a rack full of Casio-CZ’s to achieve a “fat” sound. Now you can too!

How the Casio PD synthesizers worked.

Casio’s method of Phase Distortion used oscillators which generated modulator and carrier waveforms, which were synchronized to each other.
The modulators were various wave-shapes that could ‘distort’ the carrier’s sine wave into other shapes, to a degree derived from the Digitally Controlled Wave (DCW) envelope. In doing so, many harmonics were created in the output.
As the modulators were rich in harmonic content, they could create spectra more linearly, i.e. like traditional subtractive spectra, rather than emulating Yamaha’s phase modulation (PM/FM) synthesis.
Yamaha style PM does not require oscillator sync but is usually limited to sine waves, which meant that the output audio spectrum bears the non-linear structure of Bessel functions.
PD is a different type of PM – whose different modulation system caused significant difference in operation and sound between PD and PM. Thus the two methods are significantly different.
The phase transforms were assembled from piecewise linear functions under binary logic control and show the characteristic sharp knees (and for some transforms, even sudden jumps) as they move from minimum to maximum, where the frequency counter’s accumulator wraps around and starts over. The sharp knees are smoothed by the roundness of the modulated sine wave and not too noticeable in the resulting audio signal.

Recreating Phase Distortion synthesis with SynthEdit.

SynthEdit has a Phase Distortion Oscillator module that can be used to recreate that classic sound.
The Modulation Depth input controls the amount of distortion, with Zero Volts giving a pure sine wave and 10 Volts giving a fully distorted wave.
The example below shows the effect of progressively increasing the amount of phase distortion when Wave 1 and Wave 2 are both sine waves. Wave 1 is the main (carrier) oscillator and Wave 2 is the modulating oscillator for the Phase distortion.

Phase distortion waveshapes

There are 8 different wave-shapes to choose from, and you can select different combinations of the two waves-shapes.
The Phase Distortion Oscillator module is used slightly differently from the standard voltage controlled oscillator.

Phase distortion oscillator

The wave-shapes available are: (with the addition of “none” for Wave 2)

List of waveshapes
Typical audio outputs from the Phase Distortion Oscillator


The diagram below shows a typical Subtractive Synthesiser voice containing an oscillator, VCF and VCA sections. The Filter and Amplifier sections are each modulated with a envelope generator (ADSR) , one to control the Volume, and one to control the filter cut-off frequency.

Analogue VCF cutoff sweep diagram

Here is how you can achieve a similar result using the Phase Distortion Oscillator module, with one ADSR modulating the Phase Distortion level, and the second the Audio output level.

Achieving an imitation of a VCF sweep in a PD synthesizer

There is (usually) no VCF section, instead the ADSR that would have modulated a filter is connected to the Phase Distortion Oscillator’s Modulation Depth input plug. This gives a sound very somewhat similar to traditional subtractive synthesis, but without the need for a filter. Of course if you want to add a filter into the mix there’s nothing stopping you (Hybrid Synthesis).

A simple Phase Distortion Synth constructed in SynthEdit.

The basic synthesizer is quite a simple arrangement of a PD Oscillator, two ADSR modules and a VCA, but it can be made as complex as you like with more oscillators, (plus filters if you wish), and a noise source. As with most structures, you can add to them and make them as complex as your imagination and ingenuity will permit.

Basic Phase Distortion Synthesizer

Synthedit and Karplus-Strong synthesis.

Karplus–Strong string synthesis is a method of physical modelling synthesis that loops a short waveform through a filtered delay line to simulate the sound of a hammered or plucked string or some types of percussion.
With first impressions, this technique can be viewed as subtractive synthesis based on a feedback loop similar to that of a comb filter for z-transform analysis. However, it can also be viewed as the simplest class of wavetable-modification algorithms now known as digital waveguide synthesis, because the delay line acts to store one period of the signal.
Alexander Strong invented the algorithm, and Kevin Karplus did the first analysis of how it worked. Together they developed software and hardware implementations of the algorithm, including a custom VLSI chip. They named the algorithm “Digitar” synthesis, as a portmanteau for “digital guitar”

  1. A short excitation waveform (of length L samples) is generated. In the original algorithm, this was a burst of white noise, but it can also include any wideband audio signal, such as a rapid sine wave chirp, or a short burst of a sawtooth wave or square wave (anything that provides plenty of harmonics)
  2. This excitation is output and simultaneously fed back into a delay line L samples long.
  3. The output of the delay line is fed through a filter. The gain of the filter must be less than 1 at all frequencies, in order to keep the feedback loop stable. The filter can be a first-order lowpass filter (as pictured). In the original algorithm, the filter consisted of averaging two adjacent samples, a particularly simple filter that can be implemented without a multiplier, requiring only shift and add operations. The filter characteristics are critical for the resulting harmonic structure of the tone.
  4. The filtered output is simultaneously mixed into the output and fed back into the delay line.
Karplus-Strong synthesis block diagram

With a quick look, this method of synthesis seems very close to subtractive synthesis based on a feedback loop including a comb filter. But, it can also be considered as the simplest form of wavetable-modification algorithm referred to as “Digital Waveguide Synthesis”, because the delay line stores and processes one period of the signal.

Note: this is a technical maths bit.
The fundamental frequency (specifically, the lowest non-zero resonant frequency) of the resulting signal is the lowest frequency at which the unwrapped phase response of the delay and filter in cascade is −2Pi.
The required phase delay D for a given fundamental frequency F0 is therefore calculated according to D = Fs/F0 where Fs is the sampling frequency.
The length of any digital delay line is a whole-number multiple of the sampling period. In order to obtain a fractional delay often needed for fine tuning the string below JND (Just Noticeable Difference), interpolating filters are used with parameters selected to obtain an appropriate phase delay at the fundamental frequency. Either IIR or FIR filters may be used, but FIR have the advantage that transients are suppressed if the fractional delay is changed over time. The most elementary fractional delay is the linear interpolation between two samples (e.g., s(4.2) = 0.8s(4) + 0.2s(5)). If the phase delay varies with frequency, harmonics may be sharpened or flattened relative to the fundamental frequency. The original algorithm used equal weighting on two adjacent samples, as this can be achieved without multiplication hardware, allowing extremely cheap implementations.
Z-transform analysis can be used to get the pitches and decay times of the harmonics more precisely, as explained in the 1983 paper that introduced the algorithm.

While they may not adhere strictly to the true algorithm, many hardware components for modular systems have been commercially produced that invoke the basic principles of Karplus-Strong Synthesis: using an inverted, scaled control system for very small time values in a filtered delay line to create playable notes in the Western Tempered tuning system, controlled with volt per octave tracking or MIDI data.
The Inventors are not specifically credited, though the term “Karplus-Strong Synthesis” is referenced in some of the manuals.
Some examples of hardware Synthesizers in use:
Hardware components capable of Karplus-Strong style synthesis include: the Moog Clusterflux 108M, Mutable Instruments Elements and Rings, 4ms Company Dual Looping Delay, 2HP Pluck, Make Noise Mimeophon, Arturia MicroFreak and the Strymon Starlab.

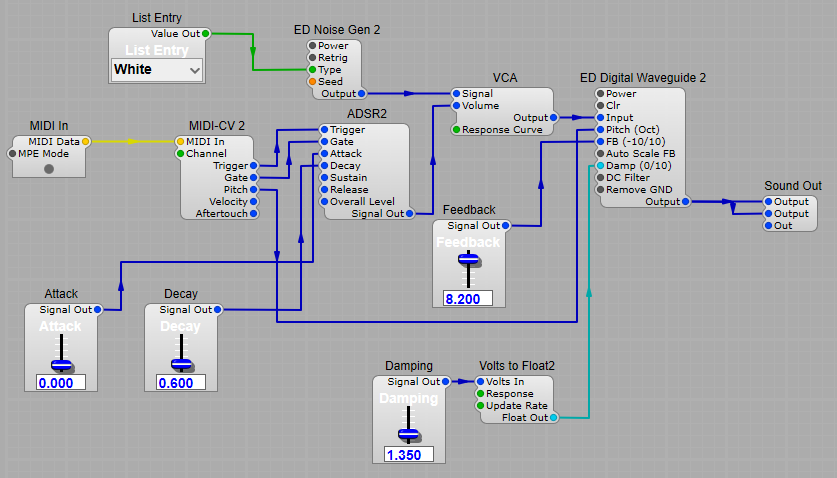
The basic structure is simple, just a noise source fed via a VCA which used to generate a variable attack-decay noise impulse to feed into the KS Delay line. Short audio pulse times give the best results. Switching between Pink and White noise gives a noticeably different end result, as do other sound sources with a wide harmonic spectrum.
The feedback control on the delay module controls the decay time of the audio output through plucked string/hammered sounds through longer decay times right up to a sound that will depend of the length of the gate control pulse.
There is a Karplus Strong type module in the Elena Design module pack, that is the ED Digital Waveguide, which is more complex to use and set up, but is worth the effort for the extra options including both negative and positive feedback signals that it supports. One caveat is that you need to read the help and support files first. The Elena Design pack along with all the help files can be downloaded from the Elena Design repository website.

The Digital Waveguide help file.

This module is back-fed fractional delay line with the following advanced features making it particularly suitable for delay-based / Karplus-Strong synthesis.
Features:
a) Fractional delay support by all-pass interpolation ensuring smooth pitch resolution and flat spectrum response for every pitch
b) The pitch can be modulated or switched abruptly without clicks or other unwelcome artifacts.
c) The DW Supports negative feedback.
d) The Feedback is adjusted on a linearity-corrected scale.
e) Built in feedback auto-scaling, so all notes will have the same decay time
HF Damp filter (LPF) in the feedback line for realistic simulation of plucked strings
f) Automatic pitch adjustment in function of the Damp factor
g) Built in automatic input DC filter with variable cutoff for DC peak abatement
h) Removal of ground (noise) spectrum for a cleaner sound
j) Every parameter is properly scaled in relation to the sample rate, so the module always produces sounds identically.
k) Suitable for polyphonic usage

About back-fed delay.
Back-fed delay can be expressed by the following equation:
y[t] = x[t-d] + fb * y[t-d]
where x is the input signal, y is the output signal, d is the delay amount in samples and fb is the feedback factor. The result is similar to that of a feedback comb filter, with the difference that harmonic peaks with both positive and negative feedback factors are always added to the original signal (i.e. resonated). This symmetrical behaviour makes back-fed delay ideally suited for Karplus-Strong / delay-based sound synthesis than a comb filter.

Notes about DC Filtering.
When using a positive feedback, the delay line will unavoidably produce equally spaced spectral peaks at positions NF, where F is the resulting pitch frequency and N is an integer starting from zero: this implies that a DC peak will always be present. A suitable high-pass input filter is included in the module, whose cutoff frequency is always half of pitch frequency to minimize any possible effect on the timbre of the audio output.

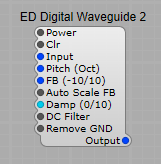
The plugs.

Power: When the Input plug goes static (no input signal), the module will become idle once the delay line stops ringing. This may or may not happen however, depending on feedback settings and other hard to predict conditions. So in order to save CPU power, the module can be completely turned off when not in use by toggling this switch.
Clr:
Initializes the delay buffer and all filter variables to a clean state. Any decaying sounds are interrupted.
Input:
The audio input signal. Static updates are not supported, so as not to saturate the waveguide with DC (every static input value before going idle is zeroed)
Pitch:
Pitch in octaves per volt. The same scaling as the SE Oscillators. The kHz/V control scale is not supported.
FB:
This voltage controls the Feedback amount: -10V = -100%, 10V = 100%.
Please note that this value does not correspond linearly to the actual feedback factor from the formula above: a linearity correction is applied internally for easier adjustment.
About feedback.
Positive feedback: This results in a comb filter with all possible harmonics Note: the harmonic at zero is filtered out if DC Filter is enabled.
Negative feedback: This results in a comb filter with odd harmonics only and half the specified pitch (no DC peak is present and the DC filter is not active when feedback is negative).
Auto Scale FB:
Automatically scales feedback factor in relation to pitch, to ensure all notes will decay at the same rate. Please remember that when a non-zero Damp factor is specified, higher pitched notes will always tend to decay faster.
Remove GND:
Removes any residual input signal or noise (ground signal) from the output spectrum, so notches truly dip to zero, and to give a cleaner sound
Damp:
A-dimensional feedback HF Damp value (automatically adjusted in relation to the sample rate). 0V = no damping factor, 10V = 100% damping.
DC Filter:
Enables removal of the DC voltages when a positive feedback is specified.

The Digital Waveguide module

This is a very basic Karplus-Strong synthesizer. There’s no filter included in the output, and no VCA either, as the sound decays naturally.
The sound generation is purely from the white/pink noise source. The sound is controlled by the Attack Decay times of the noise pulse, also by the feedback/damping settings on the Digital Waveguide.
Filtering and a further VCA/ADSR can be added as required.
Interesting sounds can also be produced by using a VCO as the input for the DW module, and using the ADSR module to change the pitch of the oscillator to produce a “chirp” to feed into the DW.

FM synthesis in SynthEdit

FM synthesis has been around for a while now and although the basic idea of using an audio frequency sine wave to frequency modulate an audio frequency carrier sine wave is (on first glance) quite simple, the end result can be a harmonically complex audio tone.
One point to note is that it may be tempting to think “If two sine waves can sound that good, how good would two sawtooth signals sound if one modulated the other?” The answer to this is, very often not that good I’m afraid. Why is this?
When you’re using two sine waves the results are fairly simple carrier + modulator and carrier – modulator because with a pure sine wave we have just two frequencies to deal with. However if we put sawtooth into the picture then things quickly get very complex and messy. Just imagine the calculations to predict the results of these two signals at 1.5 kHz and 1.6 kHz…

The results of this would be as shown below, and even with 0.1% FM its getting very messy. Note that on the low frequency end there’s a lot of noise generated…I’ll explain this later.

If we go up to just 1% as shown below this is just a total inharmonic mess with lots of aliasing. It’s no good trying to filter out the inharmonic noise once it’s been generate either.
So sum up: When designing an FM Synthesizer we need the carrier and modulator(s) to be sine waves for the results to be a) musical and b) predictable>
What we really don’t want is for any of the oscillators in the signal chain to have fast rise and fall times.

This is why FM synthesis is traditionally done with sine waves. Even when we use multiple modulators on the carrier signal, the results will still be fairly predictable. So how does the carrier and modulation produce these sounds from a sine wave?
If you take the basic sine wave (which is a pure tone) as soon as you modulate the sine wave with other audio frequency sine waves, then you’re introducing lots of new frequencies known as “Sidebands” which put (very) simply are the products of all the combined frequencies involved.

Let’s define the carrier’s frequency as C, and the modulator’s as M. The
modulator introduces harmonics to the carrier frequency. The upper
sidebands always appear at the following frequencies:
C + M, C + 2M, C + 3M, C + 4M, and so on
And the lower sidebands will appear at these frequencies:
C − M, C − 2M, C − 3M, C − 4M, and so on
Say the carrier is a 1,000-Hz sine wave, and the modulator is a 200 Hz
sine wave. The carrier’s ascending sideband frequencies are 1,200 Hz,
1,400 Hz, 1,600 Hz, and so on. Its descending sidebands are 800 Hz,
600 Hz, 400 Hz, eventually reaching 0.

In the Illustrations below we have the spectrum from various setups:
1st is a single unmodulated sine wave
2nd is a sine wave with 10% PM by a sine wave of the same frequency
3rd is a sine wave with 90% PM by a sine wave of the same frequency

Sidebands and modulation levels.

In the illustration below we have
1st a sine wave 90% modulated by two sine waves of double the carrier frequency
2nd a sine wave 90% modulated by three sine waves of double the carrier frequency

In the two illustrations below it shows the effect of reducing the modulator frequency below the carrier frequency
1st shows the modulator one octave below the carrier frequency
2nd shows the modulator 2 octaves below the carrier frequency

Effect of changing the modulation frequency

So you can see how things start to get complex very quickly. Just have a look at the setup below (And this is without any complex routing of signals, or adding feedback)

In the spectrum below we can see the effect when we have a chain of modulators with different frequencies:
1st Mod +2 Octaves, 2nd Mod +1 Octave, 3rd Mod -1Octave all modulating the carrier oscillator.

Spectrum with complex modulation
Basic FM structure without feedback

This will hopefully illustrate what happens during FM synthesis, how complex the results can be, and why we really don’t need anything other than sine waves thrown into the equation (things really will start to go out of control). The image below is created by the 440Hz sawtooth carrier, being 90% phase modulated by a 440Hz sawtooth modulator, it really is a messy spectrum with lots of aliasing thrown in. Notice how it’s got really messy down around the 20Hz region! The abrupt changes in modulation with the sawtooth means that the sidebands generated have got extremely complex, and we are generating something very un-musical with lots of Inharmonics and aliasing.

Using a sawtooth as a carrier.

Sidebands that mathematically would be negative frequencies are obviously just not physically possible, so these are “reflected”, that is, they just become normal audio frequencies that appear above 0Hz, so if one of the sidebands should mathematically be -200Hz, it will just become a 200Hz sideband.
Therefore in our calculations we can treat them as normal positive numbers and represent them as such.
For example, if C = 1 and M = 2, the first sideband is at: |C − M| = |1 − 2| = |−1| = 1.

A carrier and a modulator signal sharing the same frequency will generate a harmonic at 0 Hz, which will appear as a constant DC offset that is visible on a frequency analyser.
A simple one-pole high-pass filter with a cut-off of about 20 Hz will remove this unwanted DC offset quite effectively. It’s important to do this as it will be added to any audio signals, which could easily cause distortion through clipping.
We often express carrier and modulator frequencies as C:M or M:C
ratio, because they define the sidebands. Lower sidebands do not occur
when the C:M ratio is 1:M (the carrier is the fundamental frequency),
provided that M ≥2 or M = 1. If M = 1, then the first lower sideband is
1 − 1 = 0 Hz, which is a DC offset. The second lower sideband is
|1 − 2 ∗ 1| = |−1| = 1, or a frequency identical to the carrier’s. If M is
greater than 2, then all lower sidebands lie above the carrier frequency,
which rules out lower sidebands. Table 3.3 lists some C : M ratios and
their first ten sideband frequencies.

If a sideband’s frequency lies above the Nyquist frequency, it is mirrored—
that is, aliased, right back into the 0-to-Nyquist range. This effect
increases with the FM depth setting. You can confine it somewhat by
limiting the FM depth amount. Waveforms other than a sine will normally cause substantial amounts of aliasing.
The sidebands’ amplitude hinges all on modulation depth. They are absent without any frequency modulation, leaving only the sine wave carrier. Ever more sidebands appear as FM depth increases. The FM depth amount determines the
number and amplitude of the audible sidebands and thus the modulated signal’s overall audio bandwidth.
Vary the FM amount over time using an envelope, and you can
shape the modulated sound’s spectral component. Put simply, the carrier
envelope will determine the sound’s amplitude over time, and the
modulator envelope determines the harmonic content (timbre) over
time, behaving much like a filter envelope.

Creating an FM Synth in SynthEdit.

Technically it’s not really true FM synthesis, as what we are doing is really done with phase modulation (As it was in the Yamaha FM series of Synthesizers.
Frequency Modulation, used as a form of synthesis, was discovered experimentally by John Chowning, and was popularized initially by the Yamaha DX-7 synthesizer.
The idea is to use the output of one oscillator to modulate the frequency of another. The result is a rich, complex sound containing many, many more harmonics than is possible with subtractive synthesis.
The Yamaha DX-7 used a variation on direct frequency modulation called phase modulation. The result is the same, but with phase modulation it’s easier to control the pitch and depth of modulation independently. (Phase modulation should not to be confused with phase distortion.)

Basic FM Synthesizer structure

The first oscillator is referred to as the modulator, and the second oscillator the a carrier. Rename the modules to make this clear as you progress. I have just used structure groups to illustrate this. This is a very basic form of FM synthesizer. The scope is there so you can see as well as hear what is going on when you increase the amount of modulation. Both oscillators should be sine wave, as the results with other waveforms can become rather unpredictable. Likewise it’s a good idea for both oscillators to receive a Sync pulse from the trigger output of the MIDI to CV2 module.

As things stand this is a very basic design, and any tonal variation has to be done manually, which isn’t always very convenient, or quite what we want. However there’s quite a simple solution to this:
We can add another ADSR module with the usual Trigger/Gate connections to control the amount of Modulation reaching the carrier oscillator, so now we can dynamically change the modulation level every time a note is played.

Adding modulation to the FM Synthesizer

Yes you can have feedback in SynthEdit with one caveat: this is due to the way SynthEdit works it introduces a delay one sample long, so although we can have feedback it won’t behave quite like the feedback in a hardware FM synth (sorry, but there’s no way round this) . We just need a special module for this, the Feedback – Volts module which feeds the output of the Carrier oscillator back to the Modulator oscillator’s PM input via a Level Adj module. You’ll find you only need quite moderate amounts of feedback, as too much can cause some quite “unmusical” results. However despite these points it’s worth adding the feedback loop as it does increase the sonic possibilities quite drastically.

Adding Feedback to an FM Synthesizer


Synthedit’s HD Oscillator

This oscillator has a wider bandwidth, lower aliasing resulting in a brighter sounding sawtooth/ramp waveform. This achieved by using a series of harmonically related sine waves to create the wave forms, and thus generally has zero aliasing allowing us to have a much higher definition oscillator. This also means we can do away with the smoothing needed for the Gibbs effect in the standard SynthEdit oscillator.
Compare the frequency spectrum of two sawtooth signals (shown below) with a fundamental frequency of 440 Hz. Although the harmonic output still ends at about 30kHz the decrease in output up to this point is more linear than the older oscillator which tails off quite rapidly above 10 kHz. Let’s face it 30kHz is pretty good as it’s still way above the range of human hearing (unless of course you’re a Vampire…)

It also has two phase modes: 1) Free-running (not phase locked) 2) Sync where the oscillator always starts at the 0° phase point of the cycle. Both these modes are dependent on how the Oscillator is connected.
Note: For the VCO/DCO modes to work correctly there must be a VCA with a MIDI gate source somewhere in the audio output chain.
Note: This does not affect Phase Modulation, which works as normal in both modes.

Plugs.
Left Hand Side:

-> Pitch:- (Voltage) Controls the oscillator frequency this can be set to 1 volt per octave, or 1 volt per kHz in properties.
-> Pulse Width:- (Voltage) Width of the rectangular pulse waveform. The default control range is from -10 Volts to +10 Volts. 0 Volts = 50% width
-> Waveform:- (List) Selects different from waveforms; Sine, Saw, Ramp, Triangle, White Noise, Pink Noise.
-> Sync:- (Voltage) Applying an external oscillator to this plug Syncs the Oscillator to the external signal, produce a gnarly sound (works best with a pulse waveform)
-> Phase Mod:- (Voltage) Varies the phase of the output audio (default range -5 Volts to +5 Volts), can be used for Casio/Yamaha style “FM” sounds.
-> Disable:- (Boolean) Turns the oscillator on when “true”
-> Reset Mode:- (List) Select between; VCO (Freerun), and DCO (Sync).
The VCO (Freerun) mode means the oscillator will start at no fixed point on the waveform, whereas the DCO (Sync) always starts at the same point on the cycle.

Right Hand Side:
-> Audio Out:- (Voltage) Signal Output -10 Volts to +10 Volts.

Parameters:
♦ Frequency Scale:- Choose between 1 volt/Octave, or 1 volt kHz.
There’s no PM depth control?? No you need to control this separately. It’s not built in to the HD Oscillator.

You can use the HD Oscillator in two free-run modes:
1) By using it as a “free running” Oscillator, this means it starts at a different point on the waveform every-time a new note is triggered, as long as you leave the Sync pin unconnected. This is a bit similar to a “drifting” analogue oscillator of a vintage hardware synthesizer.

Note: if you use multiple oscillators, they all will cycle the same so you doesn’t hear any difference when listening to them if the oscillators all have the same Phase Mod value set. You will hear a difference if you set different Phase Mod values for every single oscillator or you will notice a “drifting” effect if you sync one oscillator to the MIDI-CV Gate and leave the sync plugs of the other oscillators unconnected if they both have the same Phase Mod value set.

The connection mode in operation is shown below, and as you can see the two signals are out of phase, and will be in a different phase each time a new note is triggered.


2) The other option is connecting a MIDI-CV Gate to the Sync plug of all your oscillators, which ensures they all always will start from their pre-set Phase Mod value whenever a new note is received.
When setting the Phase Mod of an OSC to 0, then it always will start from Zero Phase.

There is a third way for a special kind of oscillator, when using multiple oscillators to create a super-saw oscillator setup. That is to connect the Gate of the MIDI-CV2 module
to each oscillator, then feed each phase plug with a random voltage which is generated each time a new is triggered. This ensures that the oscillators will all start at different phase points on the sawtooth waveform each time a new note is triggered.

Of course for a true Super Saw or Unison sound we would have more oscillators, and in the case of a Super Saw you’ll also have small frequency offsets too. But the principle remains the same.

If the oscillator(s) are in DCO (Sync) mode then the waveform will always start in phase.

Even with multiple notes played you can see each sawtooth starts at the same phase of its cycle. They are synced to each other.

SynthEdit Oscillators.

The oscillator is arguably (OK we could say the keyboard, but let’s not get picky) the starting point for sound generation in a Synthesizer, after all it’s where almost all of the sounds are created.
An oscillator is a module which produces a voltage which rises and falls in a set manner, at a rate that can be used to produce an audible tone. In SynthEdit this “voltage” will vary between -5 volts and +5 volts.
The classic analogue Oscillator or VCO in a synthesizer had a choice of five basic waveforms: Sine Wave, Triangle wave, Sawtooth, Ramp (which is the reverse of a sawtooth), and Pulse.

Oscillator waveshapes and noise.

Saw and pulse waves’ spectral content is very rich. For example, a saw wave with a base frequency of 500 Hz comprises harmonics spaced at equal intervals, with exponentially decaying amplitude as shown below.

Sawtooth harmonic spectrum

However, many physical instruments harmonics are of lower amplitude at high frequencies, or may have resonances at particular frequencies. We can achieve this by filtering out, or boosting different frequencies with various types of filter.

The waveform affects the harmonics.
The exact relation between waveform and harmonic content is a very complex mathematical subject (Fourier analysis).
Sawtooth wave:
A sawtooth waveform contains all harmonics in inverse proportion to their number – with all these mathematical relationships you know something ‘natural’ is going on. So the 2nd harmonic is half the amplitude of the fundamental, the 5th harmonic is a fifth the amplitude and so on. Being so rich in harmonics, sawtooth waves are commonly used for brass, strings and some woodwind sounds.


Square or pulse wave:
The square wave contains only odd-numbered harmonics in the same proportion as in sawtooth waves. It produces a ‘hollow’ sound and is typically used for clarinets and reed instruments.


Triangle wave:
Triangle waves contain only odd harmonics, as with square waves, but at much lower amplitudes. In fact – yes, it’s more maths – the relationship is the square of the harmonic number. The 3rd harmonic has an amplitude one ninth (3×3) of the fundamental, the 5th has an amplitude of 1/25th (5×5) and so on. Although triangle waves do contain harmonics, they are not very dominant and triangle waves sound somewhat sine wave like. Some synthesizers dispense with a sine wave in favour of a triangle waveform.

Sine wave Harmonics:
A pure sine wave produces just the fundamental frequency, with no (or as close to as possible) Harmonics.
Complex Wave: Usually referred to as Noise, this is an almost random variation in audio voltage with no fixed frequency content. Useful for creating percussion sounds, and adding breath sounds when synthesising flutes or similar instruments.

We don’t need to get into the technicalities of how the shapes are created, just how to use, and control them.

Basic VCO module

The Pitch plug: This controls the frequency or “Pitch” of the oscillator, the default voltage to frequency response is 1 octave per volt, the same as an analogue synthesizer.
We connect this to a Detuner Module so that the frequency can be set by octave, semitone, and fine tuned as an offset against any other oscillators if required.
The pitch of SynthEdit’s Oscillator modules are calibrated in Volts per Octave.
This means that signal of 5 Volts on the pitch plug sets the oscillator frequency to 440 Hertz or Middle A, (the note in the centre of a piano keyboard). Increasing the input by 1 Volt will cause the pitch to rise one octave- so the oscillator frequency doubles to 880 Hz .

How pitch is related to voltage

Simplified: volts=1.442695041* Log(0.07272727273Hz)
To convert Volts to Frequency; Frequency = 440*2^(Volts-5)

To convert MIDI note number to Volts;
There are 128 midi notes. There are 12 semitones on an Octave.  5.0 Volts is middle-A (MIDI note 69) 
Volts = 5.0+(MIDI note number-69)/12


The Pulse Width Plug: This controls the on and off times of the Pulse wave form- (see the diagram below) which in turn controls the sound of the tone due to the change in the number of harmonics in the waveform. Note: This control only varies the output when the pulse waveform is selected.

Effect of varying the pulse width

The waveform plug: Connects to a drop down list or similar selector control, so you can select the required waveform.
Sync: This plug allows you to synchronize the oscillator against another oscillator, which can produce some interesting (and outright ugly in some cases) harmonic changes dependent on the frequencies of the two Oscillators.
Phase Mod plug: allows you to phase shift the oscillator waveform by applying a voltage within the range of -5 Volts to +5Volts. By connecting this to the audio output of another Oscillator this allows you to create FM type effects from the two Oscillators.
PM Depth plug: This allows you to control the amount of the signal applied to The Phase Modulation plug that affects the Oscillator.

Smooth Peaks, or The Gibbs Effect.
In the oscillator’s Properties window you will see an advanced
option called Smooth Peaks (Gibbs Effect). Now compare the two oscillators’
waveform in a scope, and you will discover they are different. The top display is with Smooth Peaks turned off.
We can see a sharp peak with a ripple effect preceding the peak.
If we enable Smooth Peaks then the waveform will more closely resemble a saw wave. Disable smooth peaks, and a big ripple and spike appear at the edge.

Gibbs effect or Peak Smoothing


Why is this? Without going into very complex maths and programming,
the waveform is band-limited, meaning that its frequencies
range no further than from 0 Hz to half the sampling rate.
The Fourier series tells us summing an infinite number of sine waves
creates a band-limited saw wave. Summing a limited number of sine
waves creates what programmers and mathematicians call the Gibbs effect; we call it ripples at the edges.
The same happens to other waveforms with sharp
edges—ramp and pulse come to mind. So, this rippling waveform is a
fixture in the digital domain. Smooth Peaks curtails the effect, but also
noticeably diminishes high frequency content above 4 kHz.

Sync X-Fade (Anti Alias):-
Reduces Aliasing noise when Syncing Oscillators at Audio rates. This can be disabled to provide precise note-on phase sync (useful for phase modulation patches) at the expense of introducing aliasing artefacts into the audio output.

Oscillator Sync:

When we Synchronise two oscillators in Synthedit, we ensure that the both start in phase (at the 0 volts part of the cycle) here we have two oscillators which are running at different frequencies, but are Synchronised.

Oscillator synchronized

With the Sync connection removed they are no longer starting at the 0 volts/0 degrees point as they did when synchronised.

Oscillators unsynchronized

When the first oscillator in the chain is higher in pitch than the following oscillator, this sync trick causes it to sound as if the following oscillator is tracking the leading oscillator’s pitch: any changes to the leading oscillator’s pitch will also cause a change in the following oscillator’s pitch. This works because you’re forcing the follower to reset in sync with the natural resets on the leading oscillator, locking them to the same frequency.
This crude form of pitch tracking can be used in a pinch to cause multiple oscillators to track together—but it’s a bit crude and has a noticeable side effect. The higher the frequency of the first oscillator, the more truncated the following oscillator’s shape will become—ultimately changing both its timbre and its amplitude. As such, this method of oscillator synchronization isn’t typically used for pitch tracking—after all, in most situations, you could just use the same keyboard, sequencer, or pitch control voltage to control both oscillators simultaneously anyway. So … what does this form of oscillator sync achieve?
Well it does produce some harmonically richer sounds by syncing even a simple sine wave, and once we get to a sawtooth the harmonics can become really wild especially when the first oscillator is lower in frequency than the second.

Oscillator 1 has a lower frequency than Oscillator 2

Oscillator 1 has a higher frequency than Oscillator 2 (Note that as Oscillator 1 rises in frequency the amplitude of Oscillator 2 will decrease)


Oscillator sync becomes very interesting once you start affecting the follower’s frequency independently from the leader. By modulating the follower’s frequency (with LFOs, envelopes, random voltages, etc.), you can achieve a crazy range of sounds some usable others- well a noise. Many of these sounds can be heard in synth lines from the 1980s (Cars, Keith Emerson to name but a few).
This is something that it’s better to try out for yourself than to hear and see the results than for me to attempt to describe

More about SynthEdit filters.

So you decide you want to use a particular type of filter…lets say a State Variable, but it’s not quite right, you need a steeper filter roll off…what to do to fix this? Fortunately you can just add another SV filter in series with the first one, and this turns a 12dB octave low/high pass into a 24dB octave filter and the bandpass/notch into 12dB octave.
So far so good, but there’s one very important thing to watch out for…the resonance settings on the filters. If we have both filters with adjustable resonance then as soon as we start to approach any moderate level of resonance the second filter will be heavily overloaded at some frequencies. To avoid this we can use the structure below, where the resonance of the first filter is fixed at 0.

Cascading filters- keeping resonance under control

Be careful when cascading SV filters.
Cascading too many band-pass or high-pass outputs is not a
good idea. It can cause annoying high-frequency ringing, because state
variable filters boost high frequencies even at low resonance settings.
Another catch with filters cascaded in series is they do introduce phase shift, so beware if you are intending to mix them with the “dry” audio signal, you’ll quite probably get some unwanted peaks and notches occurring due to phase addition and cancellation effects. You can see below that there’s clearly a change in phase between oscillator and the output of the second filter that changes with frequency.

Phase shift effects caused by cascading filters

This is a good way of achieving a stereo effect, especially using two different models of filter, as shown below with a Moog filter for the left hand channel, and the SV filter for the right hand channel. By having two independently controlled filters (albeit with a common Keyboard Tracking CV (KB Track) you can get a really rich stereo effect, (especially when the Pitch is modulated by out of phase LFO’s, but that’s another topic for later)
Note: When constructing a layout like this inside a container (as is good practice) it’s a really good idea to follow these steps:
1) Set the filter Pitch plugs to 0V (they are pre-programmed at 5V)
2) Put both of the Pitch CV’s through their own Level Adj module with the Input 1 plug set to 0 volts (again they are pre-programmed to 5V), and the Input 2 Plug set to 10V.
This prevents our container inheriting any voltages from either the Filters, or the Level Adj and setting them as an unwanted voltage on the KB Track IO Module, leaving you with an odd 5V offset appearing on another module’s control voltage. I spent quite a time at one point tracking down why the controls on one of my synthesizer modules were not behaving as expected-due to this inherited voltage from inside a container!

Parallel filtering

A multi-filter takes things a step further. I won’t show the frequency spectrum for any of the settings because you’ll get a far better idea of the sounds it will produce by building one, hooking up a white noise source and having a listen. What we are doing is taking separate outputs from each part of the filter, then mixing them to achieve a sound we like. Of course if you want to get really complex you could have four individual SV filters with individually controlled frequency and resonance settings… the world’s your oyster (or mollusk of choice)here, feel free to experiment.

Oberheim took the concept of the multi-filter and ran with it.
The Voltage Controlled filter (VCF). The available modes on the filter are:
a) One-, two-, three- and four-pole low pass
b) One-, two and three-pole high pass
c) Two- and four-pole band pass
d) Two-pole notch
e) Three-pole phase shift
f) Two- and three-pole high pass plus one-pole low pass
g) Two-pole notch plus one-pole low pass
h) Three-pole phase shift plus one-pole low pass
The output from this filter could the be mixed and routed in a variety of ways.
TD Panda filter.
The nearest ready made SynthEdit module to this is the TD_Panda filter module
However all the mixing and levels are handled internally so while there’s a huge variety of modes for the filter you’re stuck with the internally set mixing.

Filter mode options for the "Panda" filter


Panda filter connections


Synthedit VA Filters, the geeky bits.

VA is short for Virtual Analogue.
The difference between the VA and non-VA filters is a mixture of maths, physics, electronics and computer science.
As simply explained as possible (by omitting some very technical bits) by taking a Moog filter as an example.

The Analogue filter.
The real Moog low pass VCF is four single lowpass filters in series, with the output fed back to the input to create a resonance. In physical analogue circuits that output to input feedback loop is through copper tracks and wires and therefore happens almost instantly.

In the digital world, it’s not possible do that, if we think about it logically, how can you possible calculate the input and output of a filter at the same time?
You really would need to calculate the input values to be able to begin to calculate the output signal, which really is like the old puzzle:
“What came first? The chicken or the egg?”.
You will be attempting to lift yourself by pulling on your shoelaces.

To overcome this, the standard SE Moog filter will put a 1 sample delay in the feedback path. However that seriously messes with the phase response and therefore it messes with the high frequency response- it is just not at an accurate representation anymore.
This problem also depends on the internal sample-rate, and when the filter modulates very fast, due to the time delays the input and output equations don’t match up in the time frame anymore. This can create anything from instability, to low frequency clicks, and more noise.
Not only this, but if the filter signal also distorts the audio, the distortion would also not be accurate under heavy/fast modulation anymore.

Using Maths to fix it.
The VA filters use maths on the problem to eliminate (as far as possible) that one sample delay that is causing problems.
This why these types of filters are sometimes called “Zero Delay Feedback” or ZDF filters. There is actually is no technically agreed term for these filter designs so they are sometimes called “Virtual Analog” or “Topology Preserving Transform (TPT)”, and maybe other terms as well.
Mathematicians can be really touchy about naming conventions.

Another Advantage.
There is another advantage, by using VA techniques you can mimic the characteristics of an analogue circuit more accurately. This is because you can mimic the topology and layout of the filter, so it will behave in a closer approximation of the analogue filter. Now comes the tricky maths part, and it relates to the distortion of the filter.

A Mathematical note:
There are two types of answers in math; explicit, and implicit.
1) Explicit is what most people think if they think about math like 1 divided by 2 equals 0.5 – that is explicit i.e. we can calculate the exact answer of 0.5,
2) Implicit means we cannot get an exact answer, but we are able to guess with relative certainly, and this guessing is usually iterative i.e. we guess and then use that guess to guess again ad infinitum. With every additional guess the result typically gets more accurate.

Factoring in non-linearity and distortion.
Whether we like it or not there are no perfectly linear, or zero-distortion analogue circuits.
Now, if a VA filter is linear in its response (no distortion modelled) we can get an explicit solution. However once you add distortion, we cannot get an explicit solution, so it becomes implicit and we have to use more math calculations.
There are (sort of) three levels of adding distortion, and because you’re adding more calculations and complexity then CPU usage increases the higher you go in level. A 24dB/Oct filter can have nine separate distortions in it (think of it as 9 wave-shaper modules in a single filter).

Methods:
1) “Distort the states”:- This is a technically explicit method, but with the distortion at the wrong place (compared to the analogue model), but it uses the least CPU while retaining some of the VA benefits.
2) “Fixed step” solution:- This method is implicit, i.e. it always guesses a fixed number of times, the methods typically used are “Mystan’s Pivot“, where the Pivot is a fixed “One Best Guess” method.
Note: Mystan is the DSP filter guru at KVR Audio, he suggested it. Naturally the mathematics people are still debating what the real name for this method should be – after all we know mathematicians are picky about the name used for a process.
Another method would be fixed step solver would be the Runge-Kutta method.
3) Iterative (non-fixed step):- Another implicit method. This one might guess anything from once to an infinite number of times depending on filter settings and audio input. As you would expect, the more guesses made the more CPU is used. For practical purposes, this method will usually guess up to eight or nine times, and it is usually done with the Newton-Raphson method. Yes, by Newton we are referring to Sir Isaac Newton (mathematics is much older, and more advanced than PCs). As a practical example U-he’s Diva synthesizer uses this method of modelling.

(Well I did warn you it was “geeky“)

« Older posts Newer posts »