Synthedit help and tutorials

Stuck with a SynthEdit project?

Page 12 of 20

Notes about Sub Controls

Introduction:
Sub controls provide a more customized user interface than standard controls but require more expertise to use effectively. They provide a lower-level access to the various visual elements on your control panel.
There are some basic rules that need to be followed to use them with a minimum of problems.

Controls vs. Sub-Controls- Why have Sub Controls?

Before sub-controls, SynthEdit provided only pre-made controls, like the Slider Control. To understand sub-controls, it’s useful to understand how a control works.

For example the Slider:
A slider has several interacting components…
Lets have a look at the custom made slider below. The original SE slider control is included as a comparison (this control cannot be opened up-it’s one of the old ones, (so it can’t be modified without C++ coding).

Moving the slider updates the numeric text readout and vice-versa. So there’s a bi-directional connection between the two sub-components.
Your computer typically updates its graphics 60 times per second yet the output of the is at audio-rate signal (typically 44,100 or more samples per second). So it follows that there’s a rate-conversion happening inside this module.
You can’t open up the original slider to see what’s going on inside, but here’s one I put together to demonstrate what goes on:

The current position of the slider is stored in the patch-memory, and the slider will move automatically to reflect the current patch. We need to find a way of displaying the output value of the control. That’s done with the Float to Text, and the ED Text Entry modules.
The Output from the module can take various forms. Here I have included three types of data that I think I’ll find useful:
1) DSP Volts out, 2) DSP Floating Point out, and 3) GUI Floating Point out.
So you can already see how we can “personalize” and add functions to our controls in this way..

The focal point is the Patch Memory module. This handles the communication between the graphical (GUI) elements (with blue backgrounds) and the audio-processing (DSP) elements (with grey backgrounds).
The Patch Memory module also handles any MIDI Automation of the control and handles switching between any presets (patches).

With the traditional Slider the layout of the elements was fixed. There’s no way, say, to put the numeric readout at the top. But now I have this Sub Control slider I can move the elements around at will. However using the Sub Control I just created then I can modify and move elements around as I like.

Moving the elements of the Sub Control around

The purpose behind Sub-Controls.

The purpose of sub-controls is to split up the control into its constituent parts. As you saw with the slider Sub Control, this is a way of giving far you more flexibility over the appearance of your controls.

The first and focal point is the Patch Memory module. It handles the communication between the graphical elements (on the left with blue backgrounds) and the audio-processing elements (on the right with grey backgrounds). The patch mem module also handles any MIDI Automation of the control and handles switching between presets (patches).
The second type of module here is the graphics controls. The Bitmap Image and the Text entry boxes. These accept user input and display the control’s current value. Graphical elements use the Patch-Mem module as a ‘hub’. Input to any object is reflected back to the others, keeping them always in sync.
The third type of module here is datatype conversion. For example the Text-to-Float module. It’s purpose is to bridge the Patch-Mem module’s numeric (float) value with the Text-entry module (which otherwise would be used perhaps for entering a file-name).

You can see from the arrow heads in the picture below that the GUI Floating Point pins (blue background) are bi-directional. This ties in with the expected behavior.

Bi directional GUI data flow

Updating the numeric-entry box moves the knob and vice-versa. These signals are not sampled like audio signals but are event-driven. Event driven means that the control only sends data and uses the CPU when being moved, at all other times it does nothing. Compared to an audio (DSP) signal, the knob thus generates data at a much slower rate, and only when actually needed.

The signal leaves the Patch-Memory module via the Value Out plug as an audio connection, but it’s still sending data at the slower rate generated by the PC’s graphics system. This is why we include the next stage the Float To Volts module.
The Float-to-Volt smooths out, and up-samples our Floating Point data to a true audio-rate signal suitable for controlling SynthEdit’s various audio modules.
In SynthEdit these audio rate signals are called Voltages because SynthEdit is simulating an old-school Voltage controlled Synthesizer.
The Float-to-Volts module gives you control over how smooth the conversion should be. Less smoothing uses less CPU, but the resulting audio changes (especially with filters) may sound ‘stepped’ or ‘zippered’.
There is another reason this module must be included- without it the data rates will be miss-matched and updates in control position lost resulting in jerky or glitchy changes to the audio modules.

The general structure of a Sub-Control patch is:
[Graphical Control]<—>[datatype Converter]<—>[Patch Mem]—>[Audio modules]

Customizing.
You can see that the numeric input is optional, just delete it if you don’t need it. Same with the rotating knob image. Also you can now place the elements however you like.

Some of the settings available and what they do:
Hint:- Provides for ‘Tooltips’, the popup yellow boxes that appear when you mouse-over the control.
Menu Items and Menu Selection:- Provides a context menu (right-click menu). Type the menu items as a comma-separated list. e.g. “Set to Center=1, Randomize”. These will appear on the context menu, along with SynthEdit’s menu entries.
The ‘Menu Selection’ pin outputs the user’s selection as an integer. e.g. if the user clicks ‘Set to Center’ the pin goes to 1. After any selection the pin returns quickly to zero. Always number your item list from 1 otherwise the first item will always output 0 (which is no different from ‘no-selection’).
Editable:- You can use this with Text Entry boxes to stop uses from changing a label by accident, or to prevent values being entered into a control’s value box.
Greyed:- You can use this with a Text Entry box to indicate that control is not currently relevant.

Efficiency.
GUI Modules:
As you know modules with blue backgrounds are ‘GUI Modules’ (Graphical User Interface Modules). These are designed to process user-input (mouse clicks and text entry etc.). These are not intended to process audio signals. On multicore systems they will usually run on a core separate from the audio processing, this allows the audio modules to take priority when the CPU is under load.
Hybrid GUI/DSP modules:
Modules with both blue and grey pins (like the Patch Memory Modules) are hybrid modules. Internally they consist of two parts running simultaneously in separate processes. Communication between the two parts is complex and is thus more CPU intensive than between other modules.

Don’t use audio modules to process GUI signals

In general aim to keep your use of hybrid modules to the absolute minimum.
For example:
Suppose you want to increase a knob’s display to range between 0 and 100, your might think to use the standard Multiplier module. Being an Audio module, this requires an extra conversion via a patch-mem or similar. A much more efficient method is to use a ‘pure‘ GUI solution like the Float-Scaler module.
This will: 1) keep your circuit simpler and 2) your CPU usage far lower.

Use caution with GUI connections into Containers

Sub Controls are only active when the control panel window is open. When you close the control panel, the sub-controls immediately become inactive.
Not only this but GUI plugs communicate only with modules visible in the same window, so if you are passing controls though another container, you must set that containers properties so with the “Controls on Parent” are visible, otherwise the GUI signals will not pass through the container.
This behavior is in support of the new VST3 standards.

Example:- A Knob image is inside a Container, which is connected to a Patch Memory outside the control’s container. Unless the Container is set so that the Panel View is visible the knob cannot not respond to mouse movements and appears ‘frozen’, the Volt Meter and Vector Bar won’t respond to any control movements.

Sending GUI data through a container equals problems
These container settings block the data

However as soon as we change the relevant settings on the Container – Patch Mem the controls spring into life: (see below)

Changing the container settings lets the data through.
The settings that do work.


Note: The structure view will always have this issue, but if the knob’s container has ‘Controls on Parent’ set it will work fine on the Panel view.
The reason is:- With ‘Control on Parent’ set, the knob is displayed on it’s parent container’s window, which the same container the PatchMem is in.
This is confusing- So if possible, always keep your GUI connections within the same container. If you do need GUI connections into a container, you can often get the structure view working too…
For this the container’s ‘Show on Module’ needs to be set. This makes the knob visible in the same window as the Patch Mem which means the data connection works, but there’s still a catch. The right-hand window’s knob still won’t work properly. As it’s effectively a sub-container. There’s no way you can get the Patch Memory module visible in that window.

Summary: Sub controls in a container will work fine on the Panel view provided the container has ‘Show on Parent’ set.
They control may not always respond in the structure view but you can often
(but not always) fix the problem with the ‘Show on Module’ setting.

GUI modules need to be seen

Sub Controls function only while their Container’s Panel is open. i.e. if you close you synth’s panel, those sub controls become inactive.
Therefore never rely on GUI modules to process audio signals. The exception is hybrid modules (Patch Memory) which will continue to provide patch-selection and automation functions via their audio pins.

Avoid splitters
Due to a design mistake, SynthEdit 1.0 had the Container’s ‘Control on Parent’ pin on the wrong side. This made it impossible to connect it to a Patch Mem module (needed for save/recall of paged panel settings).
The ‘Bool Splitter’ was introduced to fix this problem, but the bool splitter causes problems of it’s own. The bool splitter ‘reflects’ any one input signal back out it’s other inputs, this is a bad design because it is not clear which module is in control of the others. The result is modules ‘fighting’ each other for control. Symptoms include ‘flakey’ inconsistent behavior and patches not saved/recalled correctly.
3rd party module developers have sometimes copied SynthEdit’s example and released modules that rely on the use of splitters. This is not their fault, however if at all possible avoid using splitters.

Prefabs worth studying.
SynthEdit’s Insert/Controls menu has several good examples. The Joystick module shows how to make any type of horizontal slider, vertical slider, or two-axis Joystick. Hint: For Sliders – use the resize handles to restrict the area of movement to a narrow strip.

Visual Indicators.
The LED2 prefab is a template for any type of indicator or meter. Notable is it’s clever use of a transparent overlay image to dim the light, and the use of the Tinted Image module to provide for any color light.

The Shape Envelope 3 module.

Important note. Although this page is still in situ, there is a new version of this module which should now be used. The old module has bugs, and as such it’s use for new projects is deprecated.
Please do not continue to use the old module.
The updated module can be found in the latest module pack on Elena’s website.

I have removed all information regarding the use of this old version to prevent
un-necessary complaints about malfunctions, and any bug reports pertaining to the use of the old module.

The Polyphony Module

This is another module that seems to cause some confusion. If you follow a few simple rules it’s fairly simple. However you need to read all the information on Polyphony and using this module carefully.

Rules for using the Polyphony Control Module.

Important: Do not connect any Patch Memory Modules to the Polyphony control module for any reason, as it is already a type of Patch Memory- you’ll get some very serious data conflicts! The reasoning behind this is that when you have synthesizer VSTs that support saving and loading patches, you’ll sometimes need to have different settings saved ready to be applied to the Polyphony when the patch is re-loaded (Glide for example) this will be done directly from the Polyphony module rather than having loads of extra Patch Mem modules to add.
Important: For backward compatibility (in older versions of SE) the Polyphony control module will not work if your MIDI-CV module has plugs like Mono-mode, Poly Mode, Retrigger, or Mono Note Priority pins connected. MIDI-CV2 should present no problems at all.
Note: The Polyphony Control module does not have a properties panel. All parameters are controlled directly from the module’s plugs.
Note: There is no point in connecting any GUI fixed values or Patch Memories to the control plugs because it will not work, and as stated previously connecting Patch Memories to the Polyphony Control will cause data conflicts.
The only safe “solution” is setting the correct required values in all of your factory presets, including any test or personal presets, and connect a list entry only for you to check that its value remains at the intended one, but do not make it accessible to users (i.e. either remove it when exporting the final plugin or leave it inside a non displayable container).

Monophonic Synthesizers and Containers.

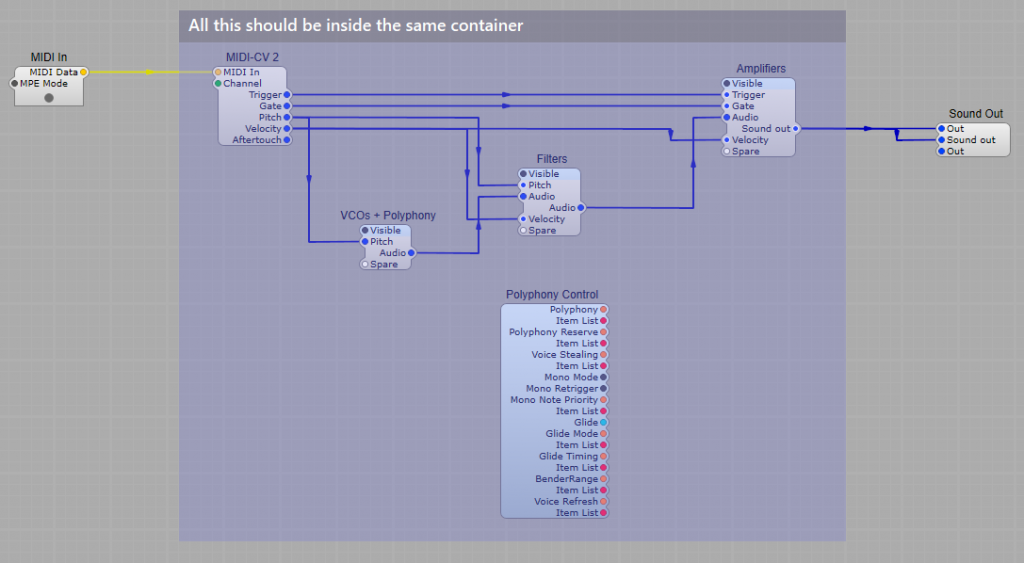
This is important to understand. If you are designing a monophonic synth, your Polyphony module musty be in the main container. Not just the VCO(s). You need to make the whole synth Monophonic, not just the VCOs’. If you don’t adhere to this you’ll get excessive CPU usage, and problems with volume/filter pitch increasing exponentially. The first structure is how NOT to construct your monophonic synth. The bottom image shows how it should be structured

In the example above each time you play a new note the Filter and VCA will get “cloned” for the new note.
However in the example below everything inside your container (everything in the purple area goes in the same container) all your modules will be Monophonic and will not get cloned, and control voltages to VCA/Filter won’t get stacked up exponentially.

Another common mistake

One common mistake with SynthEdit is to place a MIDI to CV module in it’s own container. This will lead to the Oscillator pitch jumping higher with each new note played, (and other strange things will happen).

This is because the downstream modules are outside the MIDI to CV modules container, therefore they are not cloned when you play a new note. What happens instead is the two  note’s pitches are combined before the Oscillator.

What the Polyphony Control Module does.

As the name suggests this provides control of Polyphony – how many voices (notes to you and me) the synth can play in one go.
The greater your polyphony, the more keys you can hold (and hear) at the same time, the Polyphony is usually deliberately limited to control the amount of CPU your synthesizer can use.
A sensible compromise is a level somewhere between 8 and 32 voices.

Velocity control and Polyphony.

I have a monophonic Synthesizer with velocity connected to the VCF and VCA, and each time I play a new note the volume increases exponentially.
What’s happening?
Chances are you have these modules outside of the container with the Polyphony module in it that you have set up for Monophonic use. What’s happening is that although your VCOs’ are now monophonic, your Velocity control and associated modules are outside of the module’s container, so they are still polyphonic! Because of this each time you play a note the velocity voltage will be increasing exponentially… not good. A quick fix if you have done this would be to add another Polyphony module into your VCF/VCA container(s) which is set up for Monophonic.

The Modules’ plugs and settings.


Plugs:
Polyphony:- (Integer/Text) How many notes can sound at one time.
This can be anywhere from 1 to 128 voices.
Polyphony Reserve:- (Integer/Text) These are some extra voices to be kept in reserve that will usually be unused. Why do this? The point of having these Reserve Voices is to reduce clicking during “voice-stealing”.
In the event that all of the regular voices are used up, these temporary extra “reserve” voices allow new some notes to play while SynthEdit quickly fades-out some of voices already in use for recycling.
A reserve of 3 to 8 voices will usually be sufficient, depending on how many notes you might trigger at the same instant (how many fingers have you got?).
Voice Stealing:- (Integer/Text) This mode setting controls how the voices are recycled, there are three modes:
1) Soft:- Voices are allocated in a ’round robin’ fashion (e.g. 1,2,3...). When you play the same key repeatedly, then the same voice is recycled (e.g. 1,1,1..). Soft-stolen envelopes do not hard-reset to zero but start from current level. This give a feel somewhat like a monophonic synth where repeated notes fade very smoothly into each other. Not suitable for sample-based instruments because it will cause clicks during note-on events.
2) Hard – Voices are always allocated in a ’round robin’ fashion (e.g. 1,2,3…). When you play the same key repeatedly, the previous voice is faded out very quickly.
3) Overlap – Voices are always allocated in a ’round robin’ fashion (e.g. 1,2,3…). When you play the same key repeatedly, the previous voice is faded out slowly. This allows repeated notes to build-up in intensity somewhat like a real piano for example. The disadvantage is that this mode uses more CPU than the others. Not realistic on monophonic instruments like bass, may muddy the sound and cause flanging effects on samples.
Mono Mode:– (Boolean) Only one voice is ever used, like a monophonic Synthesizer (like the first Analogue synthesizers) .
This works well for traditionally monophonic instruments like Bass synthesizers. Note: This mode is not suitable for sample-based instruments because it will cause clicks during note-on events. However you can use the polyphonic mode with Polyphony set to “1” to restrict your sampler to a single voice.
Mono Retrigger:– (Boolean) Controls how a monophonic instrument responds to legato (overlapping) note playing. With the Retrigger mode enabled you will hear envelopes retrigger for a distinct attack on all new notes. In Legato mode, any notes played as legato will now glide smoothly into each other without triggering a new envelope (no new gate or trigger pulses).
Mono Note Priority:- (Integer/Text) When in the monophonic mode when two or more notes are held, this controls which of the notes sounds. This has three modes: High, Low , and Last. High plays the highest note, Low plays the Lowest, and Last plays the last note to be held down.
Glide:- (Floating Point) The value on this plug controls how fast the pitch changes between the notes played. Glide is often known as portamento.
Note: The Glide Control plug has a floating point range of 0 to 10, rather than the expected “default” of 0 to 1 that most Floating Point plugs have.
Glide Mode:- (Integer/Text) This has two modes, Legato and Always. It controls what playing style causes notes to glide. “Always” means that there is always a smooth portamento between notes, even if there is a gap between the keys being pressed, whereas “Legato” only uses the portamento effect when notes are played in a legato style.
Bender Range:- (Integer/Text) Controls the range of the Pitch Bender wheel.
Voice Refresh(Integer/Text) This has two modes: Enable and Disable .
The Voice Refresh periodically ‘wakes’ each voice. The purpose of this is reduce clicks which may occur under the following conditions: You have changed the setting of a filter (or other recursive module) while not playing a voice, then play the voice. The click can happen when the voice ‘wakes up’ and suddenly updates the filter settings (which can cause a click). Note: Under some conditions having the Voice Refresh enabled can consume too much CPU, so this setting allows you to disable it to save on CPU cycles.

OK So all fairly straightforward then…or is it?

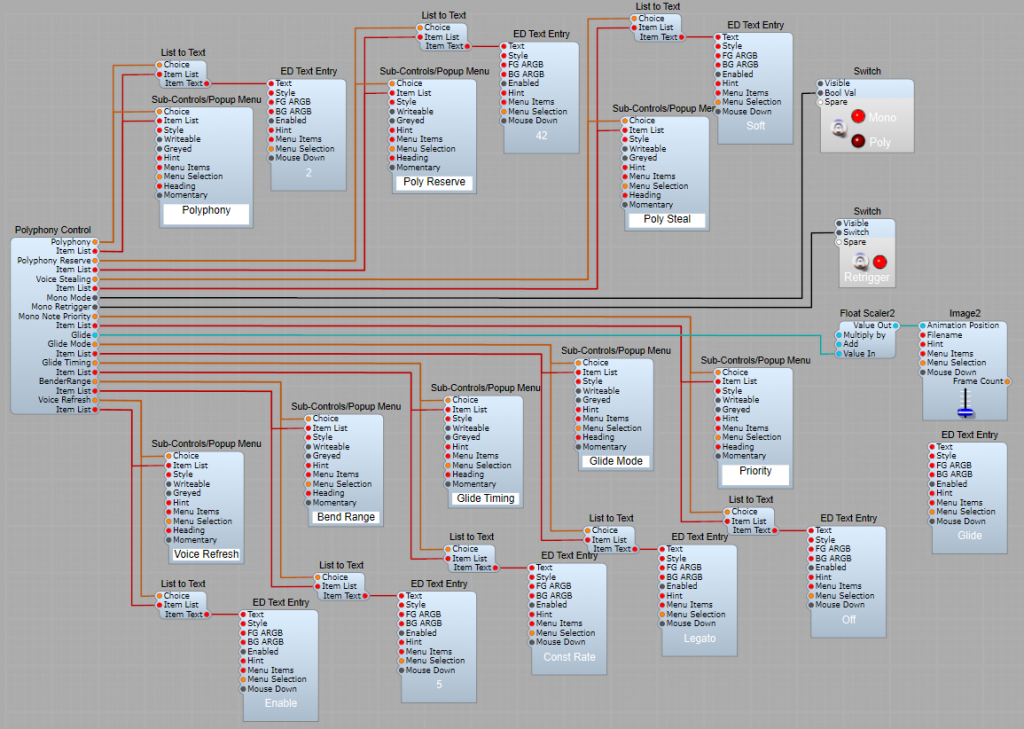
Shown below is a typical structure for a synthesizers Polyphony controller. The controller doesn’t need to physically connect to anything in the Synthesizer in order to function, it just sits on it’s own inside the main synthesizer container.

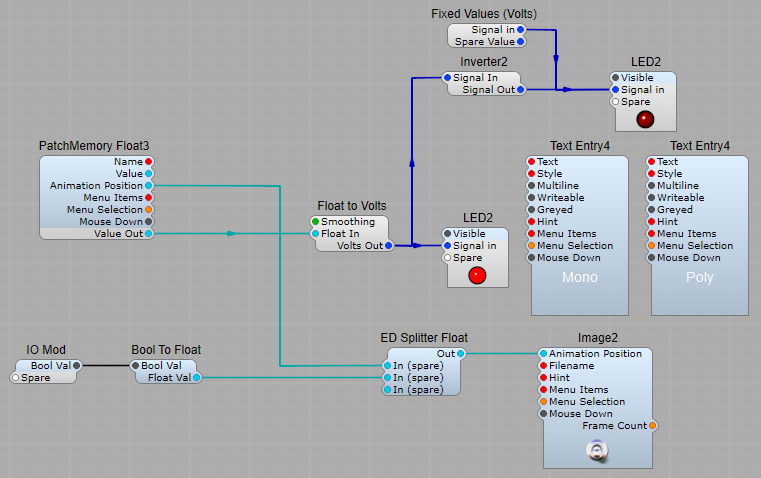
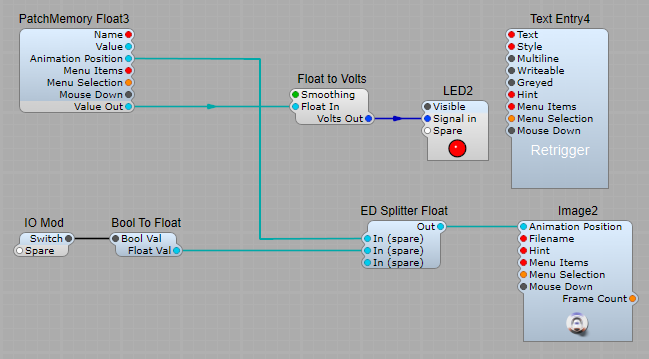
The switches that connect to the Polyphony Controller have these internal structures:
Note: I know I said don’t connect Patch Memory to the Polyphony Controller module, but these are OK as they are not connected to it, but to the sub-controls.

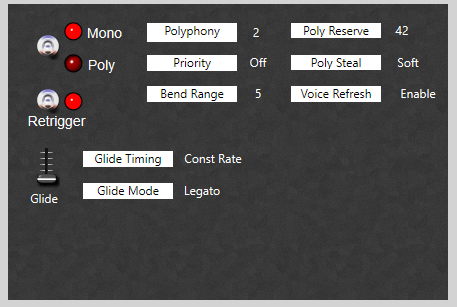
We can create a neat little control panel from which all the Mono/Poly functions can be accessed easily this way.

A Polyphony control panel using this structure.

Recap on the important bits.

  1. Never connect a Patch Memory directly to the Polyphony Controller module.
  2. You don’t need patch memories to handle your synth’s patches with this module – it handles all the settings that are in the patch itself.
  3. No fixed value modules to be connected to the Polyphony controller.
  4. Only one Polyphony Controller per container. Put all of your polyphonic synthesizer modules and containers in this main container.
  5. Do not put effects or LFO’s in the container that holds the Polyphony Controller. You’ll create clones of these modules and it can quickly send CPU usage very high indeed.
  6. Only use the Polyphony module with the newest MIDI to CV2 module. Do not connect it to the older Midi to CV module that has any mono/poly control functions.

ED Shape modules: A Shape Editable Morphing Oscillator.

The ED Shape modules allow us to create an oscillator which can morph between two or more wave-shapes. The shapes are defined using the ED shape editor, these shapes are converted from GUI to DSP inside the Shape Editor 5S prefab ready to feed into the ED Shape Morpher 2. The floating point value (0 to 1) on the Morph (0-1) plug determines the contents of the BLOB string which is fed into the ED Shape Osc 2 module and hence the output waveform.
The ED Shape amplifier is included as some waveshapes may clip when Interpolation methods such as Curve 2 are in use.
Note: Whenever a Volts to Float converter module is used for controlling any of the Shape modules, the update rate should be set to the maximum of 60Hz to ensure the response to the voltage is as smooth as possible.

Default Control Values.
Shape Reset:- I have set a reset value for all the Shape Editors of (-5,0)(5,0) to give a straight line (no output) when the reset button is clicked to give a way of quickly clearing all shape values.
Morph Slider:– Minimum 0V, Maximum 0.99V. The Morph CV input should be kept to within 0 to 1V, otherwise the changes will become very abrupt.
Shape Amp Slider:- Minimum -1V to +1V. -1V is fully inverted, and +1 is full amplitude.
Shape amplitude and ITP Curves:- Especially when using ITP Curve 2 the resulting output shape may well clip, hence the addition of the Shape Amp control (The Shape Oscillator is internally clipped at +/- 5 Volts signal level).

Shape Editor 5S.
We need to convert the GUI BLOB output of the Shape Editor to DSP BLOB data for the Shape Morpher to do its work, for which I used the ED PM BLOB NAC Volatile to do the conversion. To keep the main project structure a bit simpler this is containerized, and the structure is shown below.

Output Shape
This is another Shape Editor used as a display of the resulting shape from the oscillator. The shape changes in real time along with the Oscillators output signal. Here we have the stock SE Patch Memory BLOB Out, and a Patch Memory BLOB Int Out, the additional PM is so that we can change the Interpolation Choice on the display in line with the Oscillators Interpolation mode. The Editable box on the ED Shape Editor 5 properties should be unticked.

Bool Switch 4 Out.
To reset all the Shape Editors simultaneously I had to create this Prefab so I could have the GUI Bool outputs on the left, and also when using the RH Bool-Redir module it only lets you connect to one module at a time, hence the four separate modules and LHS Output plugs.

ED Regular Shape Generator

Using this Module we can make the Shape string Y level Nodes editable, whilst leaving the X positions locked. This allows for a much simpler, if slightly less flexible method of creating our shapes.
The module generates a regular shape by assigning auto-duplicating input Floating Point plugs to the Y positions of nodes equally spaced in the X plane.
Since a shape must have at least two nodes, the first two float pins will always be present on the module box, corresponding to the first and the last node.
The Y positions of the nodes must be specified in the correct shape units: from -5 to +5 volts and are they internally clipped by the module.
Every time any of the input values are modified, a new shape string will be transmitted to the output BLOB pin.
Important Note: the resulting shape must not be stored anywhere; it is the result of calculating and assembling the BLOB in real time with the same number of nodes as there are active Y Input plugs on the module.
Every input value is supposed to have its own Patch Memory float in case of manual or automated GUI controls, or to be connected to a DSP control voltage source such as LFO, Envelope, MIDI control, or manual slider control.

The Regular Shape Generator module:
The Module itself has only a few plugs.
On the input side we have Y #0, Y #1 and Y #n(Spare) the spare indicating that after Y #1 the Floating Point inputs are self replicating.
Note: The Shape Out plug creates in real time, and sends a new BLOB shape description when, and only when at least one of the Y #n Plug values is changed. This is not a continuous control signal.

Basic Shape Editor usage.

A basic setup is shown below using some Sliders, Volts to Float2 converters, the Shape Generator, a Patch Memory to convert from DSP to GUI, and the resulting shape displayed in the Shape Editor.
Note: Although the Sliders could in theory be connected directly to the Floating Point input plugs this is not a reliable method, as you can get missed data and “jerky” responses to control movements.

Fixing the “Start” and “End ” node values.

This structure is all well and good, but we will quite likely want to make the first and last nodes fixed at 0 Volts. All we need to do for this is make a slight change to our controls side of the shape generator. By adding a Fixed Values (float), set to 0, and connected to the first plug Y #0 and to the plug immediately after the last slider control we have now added fixed values to the start and end of the shape.

A Shape Oscillator controlled by a Regular Shape Generator.

This is an expansion of the structure shown above, with the addition of more control sliders, the Shape oscillator, and a sub-control to select the interpolation mode. The sub control is needed as we have two methods of selecting the ITP mode: by an Integer on the Shape editor, and a drop down list on the oscillator.
As the Shape editor is only required to display the shape the Editable option in the module properties can be disabled, and the Y values of the 0 and 8 nodes are locked by using Fixed values of 0.
A new shape BLOB will be sent to the oscillator whenever a slider position is updated.

The ED Shape Editor.

The Shape Editor for the Shape oscillator and wave-shaper modules.

The Shape Editor is a fully configurable graphical editor for standard ED Shapes for the Shape Oscillator using the new efficient binary BLOB transmission format.
The “legacy” shape format (string-based and using Volts values) is still supported for entering Shapes as strings by hand or through the appropriate conversion modules provided for compatibility but using this module for shape transmission is now discouraged.
A compact and an ultra-compact version are also included, which occupy less space in the structure view, by having less and less pins exposed (most times you probably won’t need to have all possible plugs exposed for connection).
More shape editors can be stacked making the background transparent. In this case, to allow editing of the background editor (click-thru), the bool option LockAddRemNodes must be enabled or editing must be disabled totally for the foremost editor, otherwise any mouse click in empty areas will be intercepted.

Shape Editor features and usage:

Shapes support from two to 100 nodes. A shape can never have less than two nodes. No such thing exists as an “empty” shape: a “void” or default shape is a shape with just the first and the last node set to zero.
Node values are internally defined in normalized float units: from 0 up to and including one horizontally, and from -1 to and including 1 vertically.
However, for compatibility reasons, node positions are still displayed and accepted in Volts by all ED Shape modules: from -5 to 5 Volts horizontally, from -5 to 5 Volts vertically.
Note about Nodes:
The first and the last node are fixed at position -5 and +5 and cannot be moved horizontally. They must always be present. The nodes between these must be present sequentially. Vertical positions must be in -5 to +5 range. No other characters or spaces may be present. Invalid strings will be rejected.
Legacy String Format:
The “legacy” string format consists of nodes defined between parentheses in Voltage units, for example: (-5,0)(1,-1)(5,1).
This format was inherited from the stock SynthEdit WaveShaper 3.
Connecting GUI Shape Modules to DSP:
Shape information is now stored and transmitted using a new efficient binary BLOB format. This means that every Shape Editor must be linked to the destination module(s) through a Patch Memory Blob module, and where required a Shape BLOB to text string converter.
Adding and removing Shape nodes:
Shape nodes can be added or removed by a double-click. A double click anywhere in the edit field will create a new node at the corresponding mouse position. Double-clicking on a selected node will delete it. The first and last node cannot be deleted: a double click on them will snap them to the specified
baseline for convenience.
Editing/Moving shape nodes:
Shape nodes can be activated with a mouse click and dragged around within their allowed limits: between the neighbouring nodes, and vertically within -5 and 5 or within a smaller range, in cases where custom MinY/MaxY values have been specified.

About Interpolation.

Interpolation Type:
Interpolation Type is still transmitted separately from Shape data. Since different Shape-utilizing modules may support only certain Interpolation Types or even just one, their DSP List pin is always properly set to relay this information to the main Patch Memory List, whose Menu Selection pin must be connected to the corresponding Shape Editor pin, and which will be automatically
configured to only list the supported Interpolation mode(s).
Important: Users must never make any assumptions about the list position of Interpolation Types and their integer values, since they might change in the future and/or more Types could be added upon need.
Interpolation None (0): This mode does not correspond to a physical interpolation and is module-specific. It really means that a module actually only needs node positions (example: to render spectral peaks or sinc pulses …) and not an actual curve. The Shape Editor will simply draw vertical lines starting from the specified baseline.
Interpolation Linear (10): plain linear interpolation (default)
Interpolation Curve 1 (20): equivalent to the former “Spline” method, uses modified cubic splines. Curve interpolation which will never fluctuate but can result non smooth in transitions from intervals of very different width.
This mode still produces a very smooth result (comparable to Curve 2) with uniformly spaced nodes.
Interpolation Curve 2 (30): Natural cubic splines. Always produces an smooth curve interpolation (second derivative is always continuous) at the expense of even huge fluctuations, close to intervals much smaller than their neighbouring ones

ED Shape Editor Plugs:

Shape I/O (BLOB): Outputs the shape description as a BLOB string. Every time the current shape is modified an updated Shape is transmitted from the Shape I/O pin. Every time a new shape is received, the editor will be updated immediately.
Interpolation Choice In (Integer): Allows the user to choose between the three types of Interpolation; None (0), Linear- the default method (10), Curve1 spline (20) and Curve2 cubic spline (30)
Active Node (Integer): The index of the active node, as available to the Active Node pin, this value is not internally stored in any parameter. To maintain it throughout sessions, please connect it to a Patch Memory Integer module.
Whenever the Interpolation Type must be fixed and not user-selectable,
simply do not connect a List Entry or Patch Memory List module, and simply select
the desired Interpolation Type from the Properties or by supplying Integer values.
Editable (Boolean): The editor can be set to read-only mode by setting this plug to “False”. This disables any editing of nodes, allowing use of the module as a graphic display of the shape string.
Lock X (Boolean): When set to “True” the horizontal (x plane) position of nodes is locked, allowing the user to edit just their vertical positions.
Lock Add/Rem Nodes: Addition and removal of nodes can be disabled, to force working with a fixed number of shape editing nodes.
Lock First/Last Nodes (Boolean): When set to “True” editing for the first and last node is disabled.
Y max/Y Min (Floating Point): The editing range for vertical positions can be constrained to within a minimum and a maximum value (Default Min/Max is +/- 5V outside this range the shape is clipped internally by the module)
Base Line (Floating Point): The vertical position of a convenient reference baseline can be specified as needed between -5 and +5 (0 by default)
Reset Value (Text String):- Specify a shape in Legacy string format to use as default value for the Reset pin. If no shape is specified (empty pin), a straight two-points shape (line) at the specified baseline will be used as default
Mouse Down (Boolean):- Outputs “True” active when the user clicks on the editor
Hint (Text):- Set here the “bubble” help text as per usual
Node Size (Integer): Sets the size of the Node in pixels. The size is in pixels from 4 to 20
Node Thickness (Integer): Sets the Nodes border thickness in pixels when the Node is not filled. The size in pixels is from 0 to 4.
Circular Nodes (Boolean): Nodes can be displayed as either squares or circles, setting this plug to “True” sets the shape as circular.
Fill Nodes (Boolean): Switches the Nodes between filled or empty, When set to “True” the nodes are filled.
Shape Thickness(Integer): Sets the thickness of the line defining the shape in pixels allowed values are 1 to 4 pixels.
Border% (Floating Point): The display box’s border size can be specified as a percentage of the total box size. This is the percentage of the border area, expressed as a percentage of every dimension, from 0 to 25 (e.g. setting 25, left and right borders will result each one 1/4 of the box width, and top and bottom borders will result each one 1/4 of the box height)
Border Clip (Boolean):- Setting this plug to “True” prevents parts of the interpolated shape which may result in shapes larger than +5 or smaller than -5 (mostly because of curve interpolation) from being drawn in the border area, and replaces them with a clipping line.
Note: Most shape-utilizing modules do not clip values internally, however when they do, this is clearly specified. Therefore, always set the Border Clip in a consistent way, since a clipping line visible in the editor can be misleading when it’s not expected.
Grid Horiz Divs (Integer): Sets the number of Horizontal (x-plane) display divider bars the values allowed are 0 to 40. (Note: these are the bars running from top to bottom of the display box)
Grid Vert Divs (Integer): Sets the number of Vertical (y-plane) display divider bars the values allowed are 0 to 40. (Note: these are the bars running from side to side of the display box).
BG Top ARGB/BG Bottom ARGB (Text String): Specifies the Alpha, Red, Green, Blue colour for the top of the display box, as standard 32 bits hexadecimal ARGB strings (e.g. 80FF00FF is a half-transparent magenta). When two different colours/transparencies are defined the box’s colour/transparency will change from one to the other gradually.
Grid ARGB (Text String): Specifies the Alpha, Red, Green, Blue colour the display grid, as standard 32 bits hexadecimal ARGB strings (e.g. 80FF00FF is a half-transparent magenta).
Base Line ARGB (Text String): Specifies the Alpha, Red, Green, Blue colour for the Base Line, as standard 32 bits hexadecimal ARGB strings (e.g. 80FF00FF is a half-transparent magenta).
Vert Line ARGB (Text String): Specifies the Alpha, Red, Green, Blue colour for the Vertical Line, as standard 32 bits hexadecimal ARGB strings (e.g. 80FF00FF is a half-transparent magenta).
Diag Line ARGB (Text String): Specifies the Alpha, Red, Green, Blue colour for the Diagonal Line, as standard 32 bits hexadecimal ARGB strings (e.g 80FF00FF is a half-transparent magenta).

The Grid:
Base Line- Shown in Red
Vert Line- Shown in Green
Grid- Shown in White
Diag Line- Shown in Yellow
Shape Fill1- Shown as an empty value.
Shape Fill2- Shown as an empty value.

Elements of the Shape Editors graphic box

Shape ARGB (Text String): Specifies the Alpha, Red, Green, Blue colour for the Shape Line, as standard 32 bits hexadecimal ARGB strings (e.g. 80FF00FF is a half-transparent magenta).

Fill Grad1 ARGB: Specifies the Alpha, Red, Green, Blue colour for the Shape Fill1, as standard 32 bits hexadecimal ARGB strings (e.g. 80FF00FF is a half-transparent magenta).
Fill Grad2 ARGB: Specifies the Alpha, Red, Green, Blue colour for the Shape Fill2, as standard 32 bits hexadecimal ARGB strings (e.g. 80FF00FF is a half-transparent magenta).
The Fill Grads.
The left hand image is with Fill Grad 1 and 2 set to light blue, and the right hand image with just Fill Grad 1 set to light blue.

Fill Graduations for the shape display

Nodes ARGB (Text String): Specifies the Alpha, Red, Green, Blue colour for the Shape Nodes, as standard 32 bits hexadecimal ARGB strings (e.g. 80FF00FF is a Active Node ARGB (Text String): Specifies the Alpha, Red, Green, Blue colour for the Shape Node currently selected for editing, as standard 32 bits hexadecimal ARGB strings (e.g. 80FF00FF is a half-transparent magenta).

Notes about shapes and shape fill gradients:
**Shape fill gradients will be drawn originating from the specified baseline**
**Double clicking on a node which cannot be deleted (like the first and the last node, or all nodes when addition/removal is disabled) will cause the node to be snapped to the specified baseline**
**When no default shape is specified in the Reset Value pin, a two-nodes straight line shape at the baseline will be used**
**For example, when the shape represents positive values, it makes sense to place the baseline at the bottom (-5); when the shape represents a spectral filtering curve, it may be more logical to set the baseline at top (+5); when it represents signed values, the baseline is more logically placed in center (zero)**

About ARGB Colour settings
These are 32 bit colour settings (including alpha channel transparency) can be specified for every graphical element of the editor as a 32 bits Hex string (e.g. 80FFFF00 is a 50% transparent yellow), allowing for display customization and transparencies. When the alpha channel (first byte) is set to zero, the corresponding element will not be drawn at all. In case of the Background, setting an alpha channel value less than FF will progressively reveal other GUI controls placed on the background in the Panel view by increasing the transparency.

Right Hand Side plugs.

Edit X/Edit Y (Floating point): A pair of Float value editing plugs (Right hand side) which are linked to the currently active node, so that its x,y value can be displayed and entered by hand if needed, by connecting a couple of Text Entry and other suitable modules. (Note: There were originally left hand edit plugs, but these have now been removed, to prevent undue connection of Patch Memories to the module which results in conflicting double storage of values.)
Reset (Boolean): Setting the plug to “True” triggers the reset function, which sets the shape to the one specified on the Reset Value Plug.
Flip X (Boolean): Flips the Shape horizontally.
Flip Y (Boolean): Flips the Shape vertically.

**CTRL key support for precise movements Note: with SE 1.4, CTRL does not work in Structure View.**

The Shape Editor 5 Plug layout

The ED Shape Oscillator.

About the Shape Oscillator.

The oscillator is based on a Look-up-table (LUT) oscillator whose waveform can be drawn, edited and supplied in form of a standard ED Shape. ED shapes are defined, stored and transmitted in the BLOB format.
The Shape Oscillator supports a Sync pulse in Boolean form to reset the Oscillator phase as well as allowing Phase Modulation of adjustable amount and feedback. The total Phase Modulation amount is the sum of the Phase plug voltage scaled by the Phase Amount value and then summed to the oscillator signed output scaled by the overall Phase Feedback value.
The internal waveform LUT is computed by interpolating through the x,y Shape nodes according to the selected Interpolation Type.
Shapes can be modulated by the various means currently provided by the ED Shape Modules pack (e.g.. by usage of a Shape Morhper or Shape Node Modulator etc.) if implemented correctly without any clicks or artifacts.
When using custom drawn waveforms, these are frequently vertically unbalanced, and for this reason an optional DC filter is provided, which will automatically remove any DC bias from the results of all LUTs.
Optional oversampling (up to 32x) for aliasing reduction is also provided.

The ED Shape Oscillator plug layou
t

Important notes about using the Shape Osc.

NOTE: Junction Points.
When drawing waveforms, especially when using the curve interpolations, the user is responsible for setting the junction points properly, in order to preserve waveform continuity (unless you want discontinuity of course). It is also a good idea to set the first and last nodes to zero in the Shape Editor and disable their editing.

NOTE: Level Fluctuations:
Curve interpolation types may cause audio levels to exceed the clipping level (+/- 10V). Internally, the LUTs are therefore always clipped at -10 and +10 V.

NOTE: About Anti-Aliasing.
Any waveform containing sharp edges (sawtooth or pulse for example) will produce aliasing at higher pitches, which can be detected in the Analyzer and heard as a nasty inharmonic (harsh and discordant) component.
The internal oversampler can be set up to a factor of 32x.
So as not to sacrifice CPU efficiency, a simple averaging filter is used for the decimation stage. It can’t offer the accuracy of SynthEdit oversampling or of an actual long sinc filter, but it is effective enough at reducing any aliasing products to a level below the audible threshold and at a fraction of the CPU cost (at least 10x less CPU load).
Keep in mind that anti-aliasing measures may well not be required, unless your shapes (or the result of shape modulation) contain sharp edges.
In the event that you would prefer to use SynthEdit oversampling, please disable the internal oversampler so as not to waste CPU unnecessarily.

NOTE: About shape modulation.
To modulate the input shape with the provided Shape Modifier modules, it is mandatory to use the SE stock Volts 2 Float converter to drive the control float pins of the modifiers with an audio signal (for example from an LFO, ADSR or MIDI control), and to set the conversion rate to its maximum value (currently 60 Hz).
Connecting a Voltage line to a Floating Point plug directly will result in a much lower conversion rate, with very disappointing results.
Actually nothing prevents shape modulation up to (theoretically) the audio rate by using a custom volts->float conversion module or other unconventional means, however despite this transmitting blobs at sample rate or close to it is highly inefficient and is strongly discouraged.
Important: The module will not parse and render any shape to an LUT more than 60 times per second anyway, so there is no real point in trying to do this!

Shape Oscillator Plug descriptions and usage.

.Off/On (Boolean):- Turns the oscillator On or Off.
Please note that, when an oscillator is used in polyphonic mode, there is usually no reason to turn it off, since will be disabled automatically by SynthEdit when no notes are playing.
.Shape (BLOB):- Input for defining the output waveform’s shape in a standard BLOB format (Maximum range -5 to +5 Volts).
Values larger than +/- 5V are internally still allowed despite this the curve may be displayed clipped depending on your Shape Editor settings. The curve will always be clipped at -/+ 10 V internally by the module though.
Important note: Two nodes cannot have the same x co-ordinates (even if their y co-ordinates are different). There must be a very small difference between them.
.Shape ITP (List):- Sets how the shape nodes will be interpolated. The options are; Linear, Curve1, Curve2.
.DC Filter (Properties):- turns off or on the built-in DC filter to prevent DC offsets from appearing on the oscillator output.
.Oversampling (Properties) :- selects the internal oversampling factor
.Pitch Units (Properties):- Selects whether voltage to pitch is to be converted as 1 Volt per Octave or 1 Volt per Hz (Note: not 1 Volt per kHz)
.Pitch (Voltage):- Oscillator frequency (LUTs for second), in Hz or Octaves as specified by the Pitch Units set in properties. The allowed range is from 0 Hz or 0 Octaves, (which still corresponds to a non-zero frequency), up to half Nyquist frequency (or 10 Octaves = 14080 Hz) depending on the Pitch Unit setting.
.Sync (Boolean) :- A true pulse resets the oscillator phase to zero (To the start point of the LUT, unless an additional Phase modulation offset is applied.
.Phase (Voltage):- (Range -10 V to +10V) oscillator phase shift, can be used for phase modulation. A voltage of +5V represents a phase phase shift of half the wave period forward (+PI) while -5V half period backwards (-PI)
.Phase Range (Voltage):- (Range 0 to +10V) Limits the amount of phase modulation applied by the Phase pin
.Phase Feedback (Voltage):- (Range -10V to +10+) Sets the amount of signed oscillator output sent back and summed to the Phase input to achieve a DX7 – like FM feedback . -10V is phase inverted and +10V is in phase.

Using the Shape BLOB string.

Shapes:
Shapes support from two to 100 nodes. A shape can never have less than two nodes. No such thing exists as an “empty” shape: a “void” or default shape is a shape with just the first and the last node set to zero.
Node Values:
Node values internally are represented in normalized float units: from 0 to and including one horizontally, from -1 to and including 1 vertically. However, for compatibility reasons, node positions are still displayed and accepted in Volts by all ED Shape modules: from -5 to 5 Volts horizontally, from -5 to 5 Volts vertically.
First and last nodes:
The first and the last node are fixed at position -5 and +5 and cannot be moved horizontally.
String Format:
The “Legacy” string format consists of nodes between parentheses in Volt units, e.g. (-5,0)(1,-1)(5,1).
Nodes and Node positions:
The first and the last nodes must always be present, and their horizontal position must always be -5 and 5 respectively, and they must all be sequential. Vertical positions must be in -5 to 5 range. No other characters or spaces shall be present. Invalid strings will be rejected.
(This format was inherited from the stock SynthEdit WaveShaper 3)
Shape information storage:
Shape information is now stored and transmitted using a new efficient binary BLOB format. This means that every Shape Editor module must therefore be linked to the destination user module(s) through a Patch MemoryBlob module
Adding and removing nodes:
Shape nodes can be added or removed by a double-click. A double click anywhere in the edit field will create a new node at the corresponding mouse position. Double-clicking on a selected node will delete it. The first and last node cannot be deleted: a double click on them will snap them to the specified baseline for convenience.
Moving Nodes:
Shape nodes can be activated with a mouse click and dragged around within their allowed limits: between the neighboring nodes, and vertically within -5 and 5 or within a smaller range, in case custom MinY/MaxY values are specified

Understanding how the shape is defined:
The easiest way to understand the Shape BLOB format is to look at the ED Shape Editor 5 in operation. It works as a grid of (x-y) co-ordinate values (referred to as “nodes”, each one of which is shown as a circle), so looking at the Shape Editor grid below, this shape would be described as:
(-5,0)(-4,5)(0,0)(4,-5)(5,0)
Breaking this down our first node has the co-ordinates x=-5 and y=0
The second node has x=-4 and y=5
The third node has x=0 and y=0
The fourth node has x=4 and y=-5
The fifth node has x=5 and y=0

Note about x and y: As in map reading the horizontal (X) position is specified first, followed by the vertical (Y) position. The x and y co-ordinates must always be separated by a comma.

The waveshape resulting from (-5,0)(-4,5)(0,0)(4,-5)(5,0)

The waveshape resulting from (-5,0)(-4,5)(0,0)(4,-5)(5,0)

So if you wanted to define a square wave the shape string would be as follows;
(-5,0)(-4.999,5)(-0.009,5)(0,0)(0.009,-5)(4.999,-5)(5,0)
Why (-4.99,5) for the second node? You cannot specify the same x co-ordinates for two nodes, there must be a very small difference between the two, likewise for (-0.009,5) and so on. So OK it’s not a perfect square wave, but we can get extremely close to this.

The waveshape resulting from (-5,0)(-4.999,5)(-0.009,5)(0,0)(0.009,-5)(4.999,-5)(5,0)

The waveshape resulting from (-5,0)(-4.999,5)(-0.009,5)(0,0)(0.009,-5)(4.999,-5)(5,0)

Getting the Shape Editor and Oscillator to communicate.

Because the Oscillator is DSP and the Shape Editor is a GUI module we need a PatchMemory Blob to link them up. If you want you can even display the Node co-ordinates by including an ED GUI Shape BLOB-> String converter (we need this to convert the shape definition from Binary data to ordinary an ordinary numeric string) feeding a Text Entry4 module to display the information.

Using the Shape Oscillator with a Shape Editor.

The ED Shape Editor5.

I used the compact version of the Shape Editor above, as this doesn’t have the colour options for the graphic editor window to make things a little less confusing.
The full version has quite a few plugs and options so that’s on it’s own separate post to cover all the options: go to the Shape Editor post.

Switching between text strings in SynthEdit.

Just for example you may be using something like the Waveshaper2B and want to allow the user of the VST to switch between different equations to change the wave-shaping effect.
There’s no need for any elaborate structures using PatchMem modules where you need to convert between GUI and DSP. It’s all easily done with GUI modules.
All we need is our pre-defined strings saved in the Fixed Values(Text) modules, and a drop down list added to select the required equation.
Don’t forget that by re naming the plugs on the switch module you’ll create a list of names to select from in the drop down list, otherwise you’ll end up with a list filled with “Spare”.

Example text string switcher.

Example Waveshaper with pre-defined shaping formulae.

The SynthEdit VCA Module

A VCA, or Voltage-Controlled Amplifier module, lets you use a voltage to control the amount of an audio signal that is allowed to pass through from the input to the output of the module.
The higher the control voltage, the more signal is passed.  In SynthEdit when the control voltage reaches 10V the entire signal is let through, and when the control voltage is 0V (or below), no signal is passed and the output is silent.

VCA or Level Adj. Which should I use?

While you could use the Level Adj module in place of the VCA, there are differences between the two modules. The VCA has a slightly faster response time to its Volume plug than Input2 on the Level Adj module. Also without conversion you’ll only get a linear response to the envelope, as opposed to the choice of curves for the VCA. Strictly speaking the Level Adj module is an audio voltage multiplier. When controlling audio volume or applying an audio envelope for best results the VCA should always be used.
The Level Adj module multiplies one input by the other. It can be used for ring modulation, or for amplitude modulation, or for scaling a signal/CV by a fixed amount. The two inputs are multiplied together, then normalised. (e.g. 5V multiplied by 2 V = 1V, (5 * 2 ) / 10).

Uses for a VCA module.

Volume Control
You can use your VCA to turn just about anything into a volume/level control. 
Run your audio signal through it, then connect the CV input to a mod wheel, or any voltage source you want.
Envelope Shaping
One of the most common uses of a VCA is envelope shaping. Think about when you hit a key on a piano; the amplitude starts out pretty loud, then over time it fades away.  If you let go of the key then the volume drops off pretty quickly. You can use a VCA in conjunction with an envelope generator to achieve the same effect with notes on your synthesizer.


An envelope generator (EG) is a module or circuit that generates a voltage that is triggered by something and changes over time.  If you’re trying to mimic a piano, you can configure the EG so that it is triggered by a key being pressed on your keyboard, it sends out a strong voltage at first, then it fades down to 0 over time.
The voltage sent out by the EG matches the way you want your amplitude to change over time.  Connect the output of the EG into the CV input of your VCA and it will cause the amplitude of your note to fade out like a piano note.
The structure shown below illustrates a typical ADSR/VCA combination to trigger an audio envelope from a MIDI input

The VCA response curve modes:

The VCA Module allows you to choose from 3 different response curves via a drop down list, or a selection in the VCA module properties:
1) Linear
2) Exponential
3) Decibel
4) Decibel (Old)
The following chart shows the relationship between input and output voltages

Comparing VCA response curves

A more useful graph is the output volume in decibels for a given input voltage. This shows more accurately how loud the signal sounds in relation to the control, voltage (below).

VCA loudness curves

This graph shows that volume plug input of 10 Volts produces full volume (or 0 Decibels), and an input of 0 volts effectively gives silence (-70 decibels, very quiet).
A full-scale audio input signal is -10 to +10 Volts.
The normal output range of SynthEdit’s Oscillators is -5 to +5 Volts (about -6dB).
Note: SynthEdit’s own VU Meter module displays an averaged signal. However you can switch it to peak mode.
What do the audio envelopes look like? All these sounds have the same ADSR envelope settings, but use different VCA modes.

1) Linear Mode.
This is useful for controlling the level of LFO’s or other modulation sources.
However for audio use such as a VCA this doesn’t sound like a natural audio decay to the human ear, as it seems to become faster as the level decreases.

Linear fade out

2) Exponential Mode:
This emulates the discharge rate of a capacitor (which is how an analogue ADSR works) and so is the closest reproduction of the audio envelope produced by an analogue synthesizer.
Given a volume from 0 – 10, this formula gives the output level in volts.
volts = 10 – c1 * (1 – e^( 3 * (volume / 10 – 1)))
Where ‘c1’ is a constant that determines the amount of curve:
c1 = 10 / ( 1 – e ^-3 )
c1 =10.524

Exponential fade out

3) Decibel (dB) Mode:
The human ear hears this as a constant, natural fade.
The Decibel curve drops by 35 dB between 10 – 1 Volt.
dB = (35/9) * ( volume – 1.f )
Volts = 10 * 10.f ^ ( dB * 0.5 )
Since a perfect dB curve can never reach zero volume in reality, the Synthedit VCA is designed so that below 1 Volt the VCA dB curve fades out to silence. This mode gives the most natural sounding VCA envelopes of all.

Decibel fade out

Converting Volts to dB

To convert a level in volts to dB, use the following formula:
dB = 20 × log10 (volts ÷ 10 )
To convert a level in dB to Volts, use the following formula:
volts = 10 × 10^ (dB ÷ 20)

Tremolo

Mix a slow sine wave with 8V DC from a Fixed Value(Volts) module (to make sure the whole sine wave stays above 0V), then feed this into the Volume Plug of your VCA.  The audio signal will mostly come through to the output because of the DC bias, but you will hear the amplitude get louder and quieter in time with the sine wave you are using to modulate it. 
This effect is called tremolo (Amplitude Modulation). In the screenshot below the Yellow waveform is the modulation sinewave and the green is our audio. You can see how the peaks and troughs in the audio level follow the modulating sinewave.
The slider control changes the level of the modulating sine wave, this works best with the maximum level set as 8V.
Note: For this effect to work correctly the response curve must be set as Linear.

Amplitude Modulation

Tremolo (shown above) uses a slow (say 3Hz for example) sinewave to modulate the amplitude of your audio signal, so you can actually hear the resulting loud/quiet cycles.  If you increase the modulating frequency so that it gets up into the audio range, however, things start to get interesting. 
The modulation has become so fast that you are now changing the shape of the original audio signal’s waveform, and new frequencies appear.
In the example below I have modulated a 7kHz sine wave with a 4kHz sine wave. As you can see in the Frequency analyser, not only do we have the 7kHz audio signal, but also two new frequencies have appeared at 3kHz and 11kHz. This is where the 4kHz signal has interacted with the 7kHz. Why 3 and 11 kHz? It’s because the frequencies are added and subtracted in the modulation process:
7kHz – 4kHz = 3kHz and 7kHz + 4kHz = 11kHz. This is similar to ring modulation, but there’s one key difference, with Amplitude Modulation the carrier frequency (the 7kHz signal) is still present at the output, whereas with a true balanced ring modulator only the new 3kHz and 11kHz frequencies would be present the 7kHz carrier having been suppressed.

Complex Amplitude modulation.

However it’s not always this simple to predict the results, if we modulate the 7kHz sine wave with a 4kHz sawtooth then the mathematics becomes more complex- we get many more frequencies added, (due to the more complex harmonic structure of the sawtooth)and would need to use Fourier analysis to predict the outcome.

Synthedit Sequencer project.

This is where a number of other posts all “come together” to form a major project- a 16 step sequencer. Arguably one of the best known sequencers being the Moog 960 Sequencer module (see below).

What is a Sequencer?

Sequencers for synthesizers are typically constructed with analog electronics, and play the musical notes designated by a series of knobs, sliders or other selectors corresponding to each musical note (step).
An analogue sequencer is useful for both composition and live performance as the musician can change the musical notes at any time without having to re-enter a recording mode as would be needed with a many digital sequencers.
Another control option is that the time interval between each musical note (length of each step) can be independently adjustable. Typically, analog sequencers are used to generate the repeated minimalistic phrases which may be reminiscent of Tangerine Dream, Giorgio Moroder or trance music. The steps are not limited to controlling Pitch and note duration, we can also control the filter cutoff, note velocity, and many other parameters.
Can we produce the equivalent of an analogue sequencer using SynthEdit? As with many other synthesizer functions/modules the answer is with a bit of planning- yes we can, with as many “bells and whistles” as you feel you need.

Our Sequencer prefabs so far are:

The BPM Clock sets the tempo of our sequencer by synchronizing it with the host DAW, it could also have a free-run option that’s not locked to the host DAW.
The Step Counter takes the stream of clock pulses from the clock oscillator, counts them and outputs an Integer. We can make this count up, down or in pendulum mode. The number of steps in our count can also be controlled.
The Integer to Step converter this takes our Integer and outputs a Boolean message as each integer is output which is specific to that particular integer, which is then fed to
The Step Modules which contain the modules producing the voltages which will control the Synthesizer connected to our sequencer via a few other modules.
See the structure shown below:

In the output section we have two ED Glider modules, which introduce a Glide or Portamento to the transition between our two CV outputs for Filter (cutoff) and Pitch. The Glide Time slider has a maximum value of 0.1 set (You could alter this, but 0.1 is about the maximum Glide rate you’ll want). The glide timing method can be changed between Constant Rate and Constant Time.

The ED Gliedr module

There is a Level control in the Filter CV output so we can change how much the steps affect our VCF.
The Divide module is to reduce the Velocity output to a useful amount. I used a value of 2 on the Input 2 Plug.
The Monostable in the Gate Output is used to produce a short trigger pulse for triggering ADSRs and so on.

« Older posts Newer posts »