There are two third party Text Entry module provided by Davidson in his module pack DAM Text Enter, and DAM Text Enter Std.
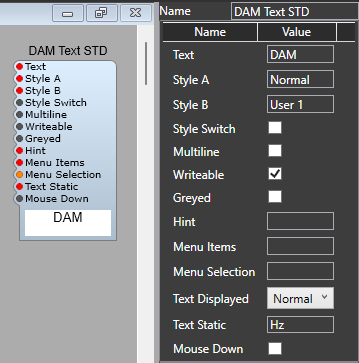
DAM Text Enter Std.
Compared to the standard Text Entry 4 module this has a few additions.
1) There are two Style inputs which are switchable via the Syle Switch plug. So you could have two styles in use, for example; Normal Text Box, and GUI Text Box. Changing the Style switch from true to false will switch between the two styles.
2) The Text Static plug. This allows you to supply a an extra text string. In the Properties Panel there is the Text Displayed drop down (not available as a plug) which allows you three options; (i) Normal- Text Static is ignored, (ii) Append Text which adds the Text Static string after the normal text, (iii) Prepend Text adds the Text Static string before the normal text. Useful but to change styles we still need to edit the global.txt file.
DAM Text Enter.
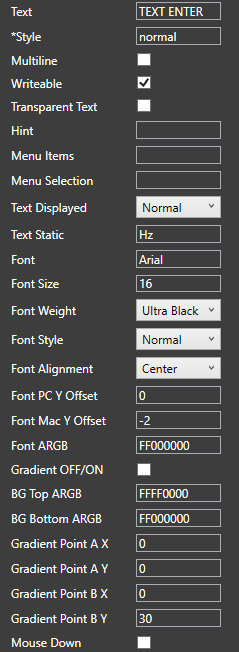
This is similar to the DAM Text Enter STD, you can still use the global.txt file if you want to, but you have the option of specifying (as well as the appended/prepended text) the following;
Font,
Font Size
Font PC Y Offset
Font MAC Y Offset
Font ARGB
Background Gradient On/Off
BG Top ARGB
BG Bottom ARGB
As well as the Gradient Points AX, AY, BX, BY.
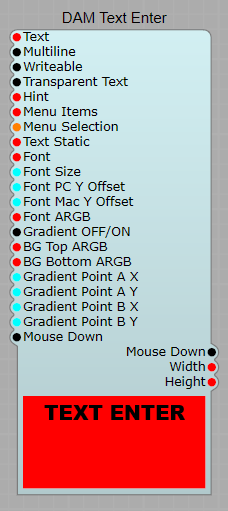
Plugs & Properties.
Text: Text input/output pin in string format. Being GUI this is bi-directional.
*Style: Some meta data is still used for MAC vertical offsets. Set this style to match the global option of offsets.
Multiline: Turn on to enable multiline text formatting.
Writable: Turn on to enable text input by clicking on the text entry box.
Hint: Enter a hint to be displayed with mouse hover.
Menu Items: Set items for the right click menu.
Menu Selection: Enter the Integer number to pick the corresponding menu item.
Text Displayed: Select how static text will be displayed. Normal mode only uses text from the Text pin. The options are; Normal, Append and Prepend.
Text Static: Enter the text for static use, when either append or prepend display settings are applied.
Font: Specify a font in string format spell exactly matching fonts installed. If unsure what the exact font names are check a text editor to see available fonts. For example: Arial. Note as usual stick to system fonts. If the font is not supported on another PC, your VST’s GUI text will be different.
Font Size: Set a font size in pixels.
Font Weight: Select from levels of boldness from thin to ultra. Check amount applied cross platform to ensure levels.
Font Style: Specify normal, italic, or oblique font styles.
Font Alignment: Specify the font alignment; leading (left), center, trailing (right).
Font PC Y Offset: Adjust the Y axis placement of the text for PC. This is the text desired position use the MAC adjust only to fix MAC offset from PC setting.
Font MAC Y Offset: Adjust the Y axis placement of the text for MAC. This will be applied along with the PC offset. PC offset affects both systems. MAC offset is an addition or subtraction to the PC offset only on MAC.
Font ARGB: Set a font color in ARGB format FF000000.
Gradient OFF/ON: Turn on off background gradient.
BG Top ARGB: Set the top background gradient color in ARGB format.
BG Bottom ARGB: Set the bottom background gradient color in ARGB format.
Gradient Point A X: Set the A point X value gradient stop in pixels.
Gradient Point A Y: Set the A point Y value gradient stop in pixels.
Gradient Point B X: Set the B point X value gradient stop in pixels.
Gradient Point B Y: Set the B point Y value gradient stop in pixels.
Mouse Down: Left and Right side mouse down outputs when text box is clicked.
Width: Outputs the width of the text box in pixels.
Height: Outputs the height of the text box in pixels.
Note: These plugs are ouput values only, and are intended purely to make it easier to size text boxes so they match.
They do not accept input values.
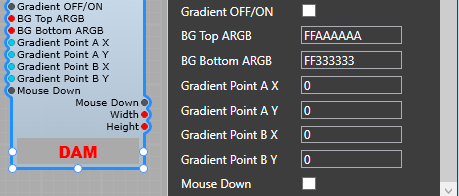
Gradients.
I think the easiest way to explain these settings is visually:
No Gradient: Uses only the BG Top value of FFAAAAAA
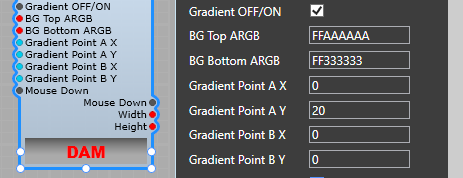
Gradient On AX = 60: LHS uses FFAAAAAA, RHS uses FF333333.
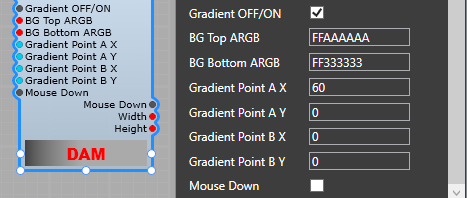
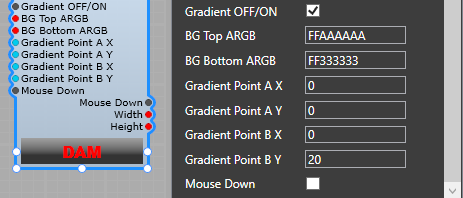
Gradient On BX = 60: LHS uses FFAAAAAA, RHS uses FF333333.
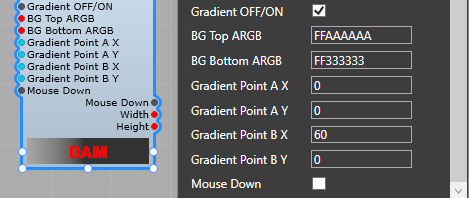
Text area size = 200×200 px
BX=100, AX=100.
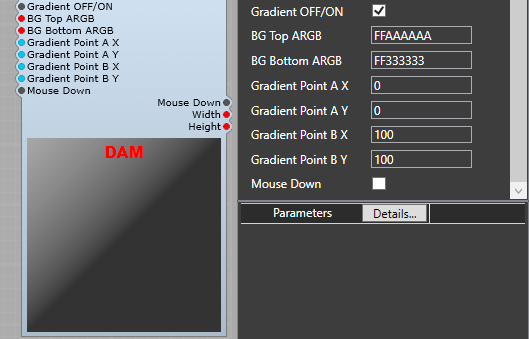
This should give you a rough idea of what’s going on. Experimentation is the key to understanding these gradients.
NB The AX, AY, BX, BY values are and the gradient position are related to the size of the text area.
Gradient On, all points set to 0. Uses the BG Bottom value of FF333333.
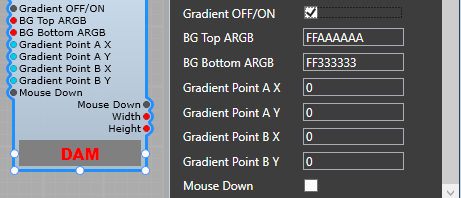
Gradient On AY = 60: Top uses FF333333, Bottom uses FFAAAAAA
Gradient on BY = 20: Top uses FFAAAAAA, Bottom uses FF333333
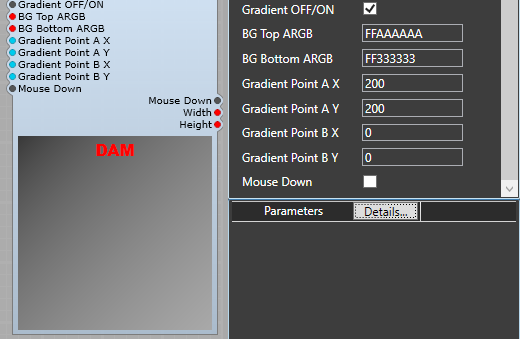
Text area size = 200×200 px
AX=200, AY=200.
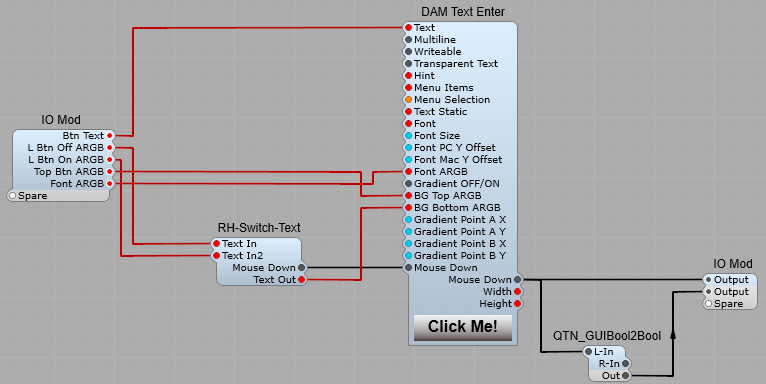
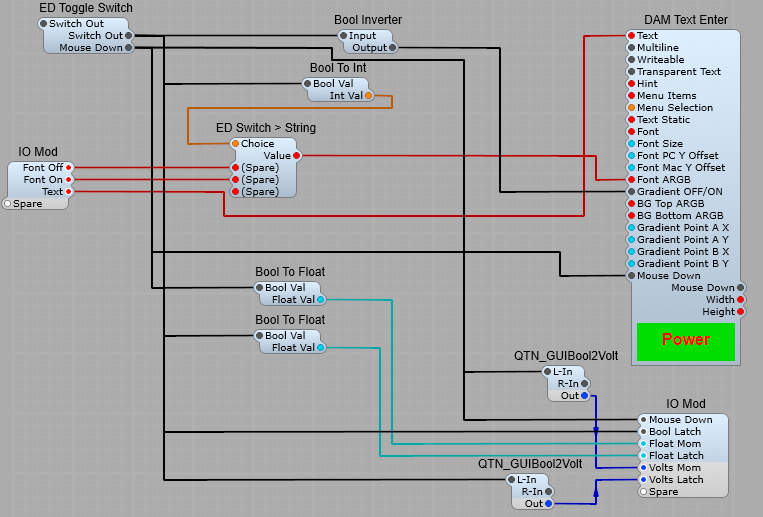
Using the DAM Text Enter as a Push Button.
Note: Third party modules required.
As well as The DAM Text Enter you need these other modules;
RH-Switch-Text to swap the colour values for the lower button
QTN_GUIBool2Bool to convert the output to DSP.
ED GUI Timer for the latching push button.
By using the BG Colour/Gradient, and the Mouse Down output plug you can make latching and non-latching push buttons.
Momentary (Non-Latching) Push Button.
RH-Switch-Text is used to swap between the L Btn Off and L Btn On colours using the LHS Mouse Down plug. QTN_GUIBool2Bool converts the GUI bool to DSP. Patch Memory Bool is not suitable here due to the Plug positions on the Modules.
Latching Push Button.
Here the RH GUI Timer is used to latch the Mouse Down output in it’s On state, until a second click on the button switches it back to the off state. This is set in the module properties, Mode=Bistable. Note: T1 and T2 have no effect in this mode.

Alternative Latching Push Button.
This button also changes text colour when clicked, and switches from a graduated green to fully green.
Leave a Reply